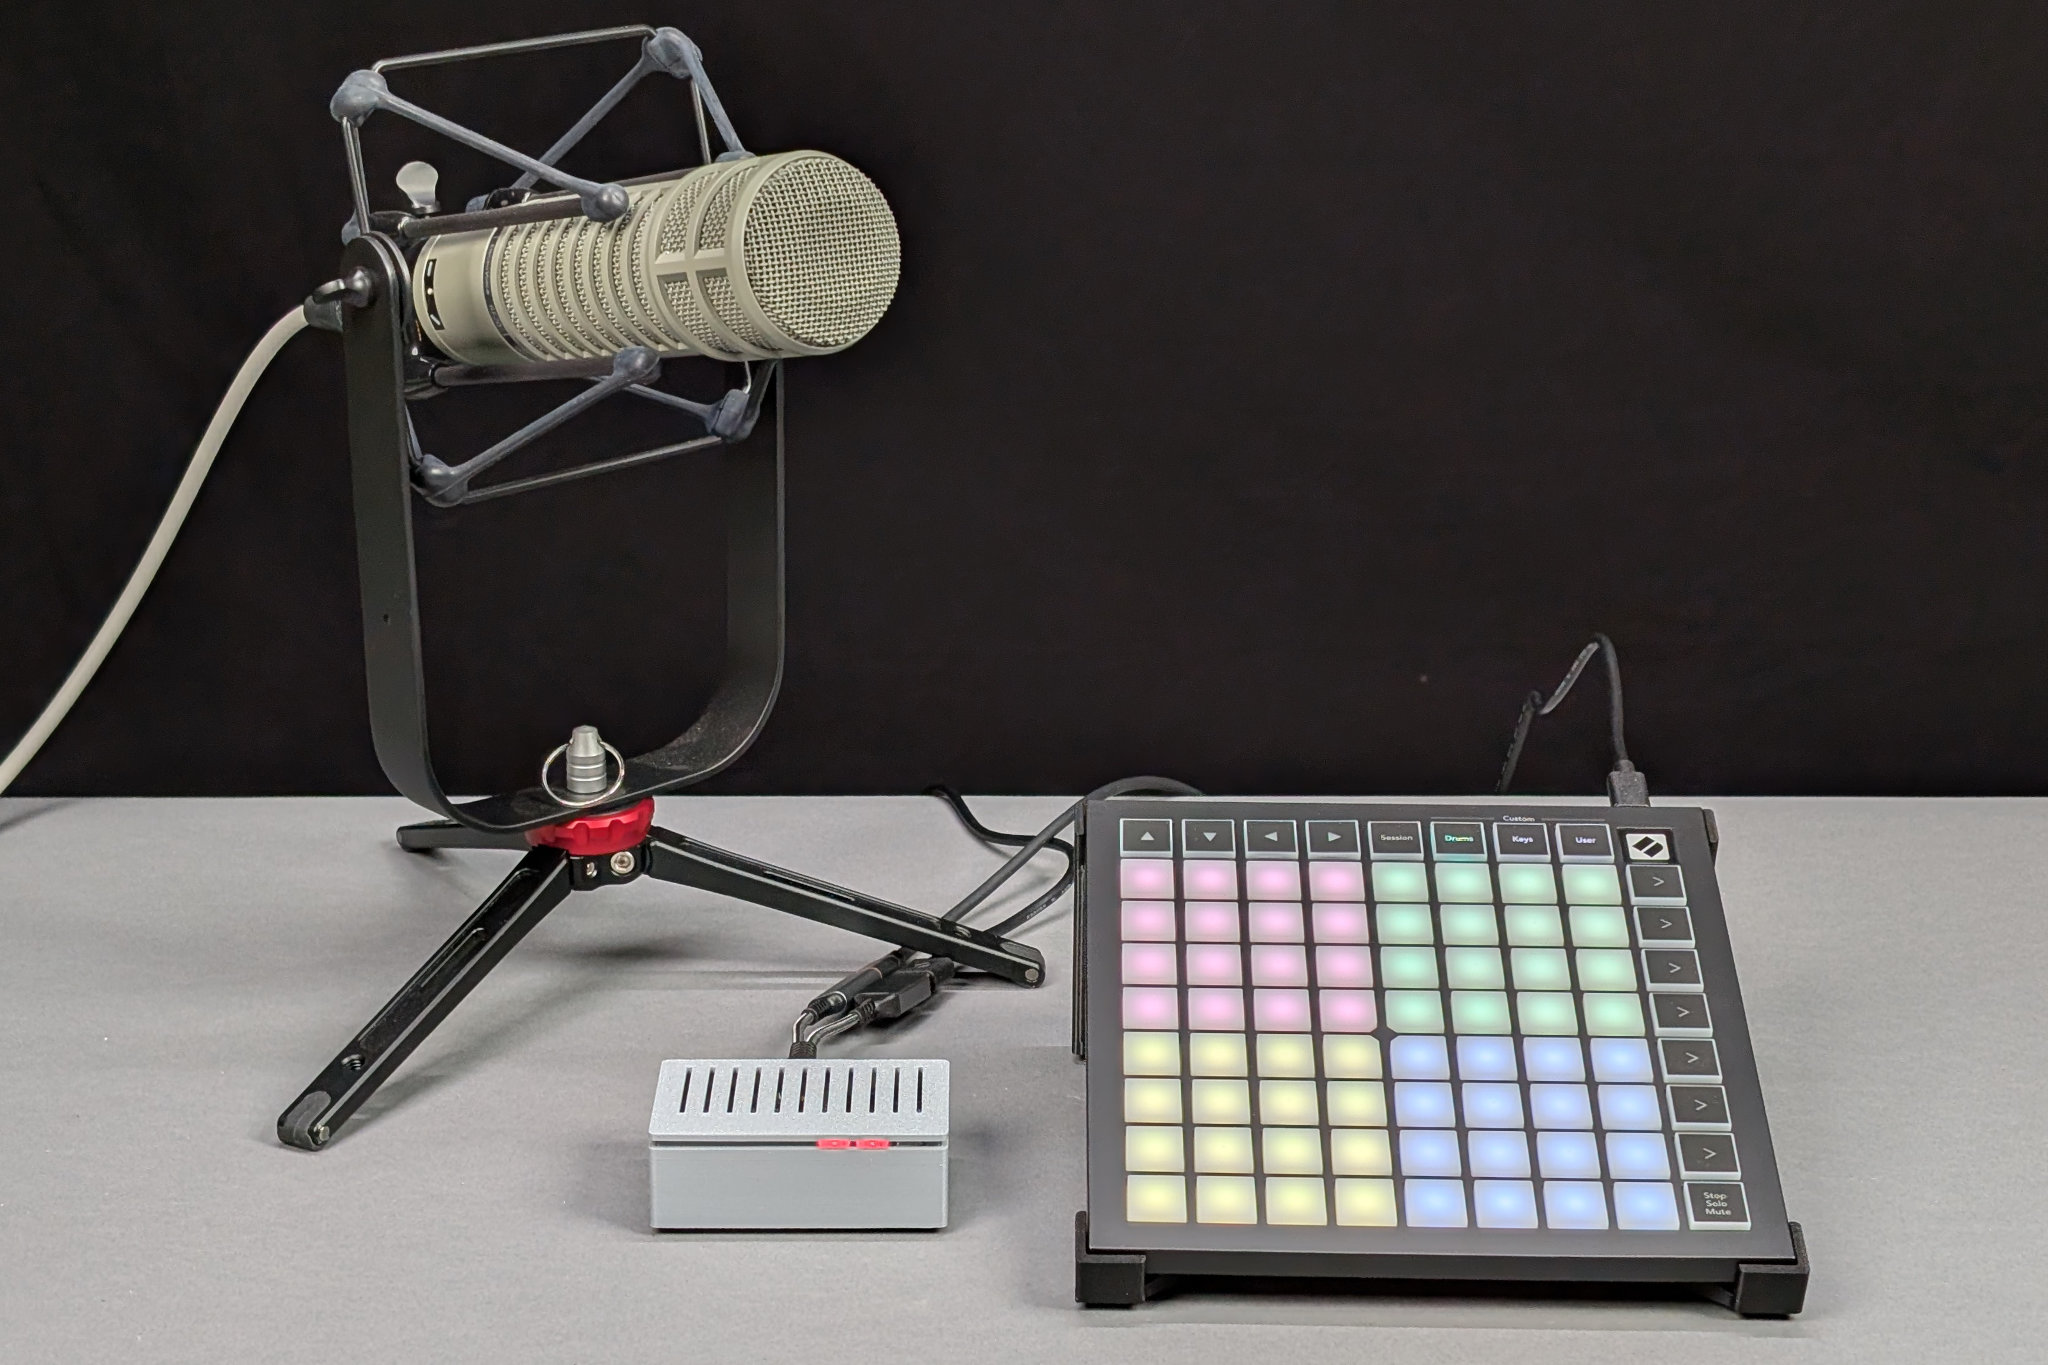
Relive Your Best Mountain Bike Descents on a Vintage Aircraft Altitude Indicator

A video demonstrating the play back of a descent from a recent mountain bike ride on the vintage aircraft altitude indicator..

In this project, I use a Python script and an updated version of my digital-to-synchro project to replay my mountain bike climbs and descents at 60x real time speed on a vintage aircraft altitude indicator. The updated D2S converter fits on a single board and uses three Microchip MCP4802 DACs and three TI OPA548 power operational amplifiers to produce high-power 400 Hz AC waveforms to power and control the servo loop in the altitude indicator.

Continue reading

Posted in Uncategorized | Comments Off on Relive Your Best Mountain Bike Descents on a Vintage Aircraft Altitude Indicator

The Kollsman Electric Tachometer Indicator

A video showing the Kollsman electric tachometer indicator ramping from 0% to 100% then 105%, 120%, back down to 100% then to 50%, 25%, and 5% then finally back down to 0%. At 100%, the three-phase, four-pole AC synchronous motor inside the indicator is spinning at 2100 RPM.

In this post, I take a look at a vintage Kollsman aircraft electric tachometer indicator. I start by disassembling the tachometer to determine how it works then build up a variable-frequency power supply to power and test the indicator. Once the power supply and indicator are working, I measure the speed of the motor inside the indicator to determine the number of poles on the motor. Finally, I repurpose this indicator as a unique CPU performance meter.

Continue reading

Posted in Uncategorized | Comments Off on The Kollsman Electric Tachometer Indicator

Positioning a Synchro Receiver’s Shaft from a Terminal Window

That's a lot of hardware to rotate the synchro receiver.

That’s a lot of hardware to rotate the synchro receiver on the right!

In the last project, I built a synchro-to-digital converter to display a synchro’s shaft angle on a small OLED display. In this project, I reverse the process and build a digital-to-synchro converter that sets a synchro’s shaft to the angle entered into a terminal window.

Continue reading

Posted in Uncategorized | Comments Off on Positioning a Synchro Receiver’s Shaft from a Terminal Window

Resolving a Synchro Shaft Angle Using Modern Hardware

abc

Can this hardware determine the angle of the fine altitude’s synchro resolver accurately? Read on to find out!

This project uses modern data acquisition hardware to track the shaft angle of a synchro transmitter as the shaft is turned through various angles. How difficult could it be to get the absolute angle of a position sensor from the 1980’s that was originally developed during the WWII era into a modern computer? Turns out, it’s more difficult than it seems, and for most hobbyist applications, more difficult than it’s worth. Read on to find out more.

Continue reading

Posted in Uncategorized | Comments Off on Resolving a Synchro Shaft Angle Using Modern Hardware

Converting a WW2-era Landing Gear and Flaps Indicator into a USB Peripheral

The landing gear and flaps indicator, control board stack, and C# .NET Windows Forms app running on the Surface in the background. Everything set for smooth and level flight!

The landing gear and flaps indicator, control board stack, and C# .NET Windows Forms app running on the Surface in the background. Everything set for smooth and level flight!

In this project, I convert a WW2-era landing gear and flaps indicator into a USB peripheral using a Raspberry Pi Pico development board and eight channels of programmable current sources. This project is similar to my WW2-era engine cowl flaps indicator project but the gear and flaps indicator requires a different control strategy.

This post starts with a look at the gear and flaps indicator, its theory of operation including its differences from the engine cowl flaps indicator, and some ideas to control it with modern electronics. The post then covers the design of the boards, the software for the Pico dev board, and a Visual Studio C# .NET Windows Forms app for controlling the indicators from a PC.

Continue reading

Posted in Uncategorized | Comments Off on Converting a WW2-era Landing Gear and Flaps Indicator into a USB Peripheral

Converting a WW2-era Engine Cowl Flaps Indicator into a USB Peripheral

General Electric 8DJ4xxx quad engine cowling indicator with PIC16F1459 and MCP41HV31-502 board to its right. Microsoft surface controlling the indicators via USB in the background.

General Electric 8DJ4PBV quad engine cowling indicator with PIC16F1459 and MCP41HV31-502 board to its right. A Microsoft Surface in the background is controlling the indicators via USB.

In this project, I convert a WW2-era engine cowl flaps indicator into a USB peripheral using a Microchip PIC16F1459 microcontroller and four Microchip MCP41HV31-502 digital potentiometers. This project is reminiscent of my USB analog panel meters project but the drive circuitry is significantly less complex. This post starts with a look at the engine cowl indicator, it’s theory of operation, and some ideas to control it using modern electronics. The post then covers the design of the board, the software for the microcontroller, and a Visual Studio C# .NET Windows Forms app for controlling the indicators from a PC.

Continue reading

Posted in Uncategorized | Comments Off on Converting a WW2-era Engine Cowl Flaps Indicator into a USB Peripheral

Building a DIP Switch USB Stick Using the Microchip PIC16F1459

The complete DIP switch USB stick plugged into my Surface Pro tablet.

The complete DIP switch USB stick plugged into my Surface Pro tablet.

Tired of editing XML and JSON files to store configuration settings for your hardware or software? What if we could go back to using DIP switches for configuration settings? Well, with the DIP switch USB stick, you can! No more telling relatives how to fire up vim or emacs and edit a file during those late-night family tech support calls. Yeah, just flip the red switch!

Continue reading

Posted in Uncategorized | Comments Off on Building a DIP Switch USB Stick Using the Microchip PIC16F1459

The Scramblepad Hardware and Protocol

I first saw a Scramblepad on the door of an office building I worked at while in high school in the late ’80s. I always wanted to own one or to make my own based on seven-segment LED displays but had trouble finding a suitable, transparent touchpad I could use for the buttons. I eventually gave up on building my own.

Luckily I found a few Scramblepads up for sale recently and decided to buy one to see if I could do anything useful with it. With a bit of work, I reverse engineered the communication protocol and can now use my Scramblepad with my own simplified homebrew door controller. Read on to learn more about the hardware, the communications protocol, and building a homebrew Scramblepad compatible door controller.

Continue reading

Posted in Uncategorized | Comments Off on The Scramblepad Hardware and Protocol

Building a Simple RFID Door Access Controller

In this project, I build what is quite possibly the world’s simplest (and least intelligent) door access controller to let me open and close my garage door using my mountain bike helmet. We’ll take a look at my motivation for the project, review some available RFID readers, pick a reader, then design and program the simple access controller. The simple access controller will receive the card ID from the RFID reader, compare the ID against a list of authorized cards, and make the decision to activate the garage door opener or not. Afterwards, we’ll briefly talk about the security of the system and include some ideas on how to improve the project.

Continue reading

Posted in Microchip, PIC18, Uncategorized | Comments Off on Building a Simple RFID Door Access Controller

USB Knob Box Doubles as a Blackmagic Designs Camera Remote

The finished USB Knob Box.

The finished USB Knob Box.

I have a Blackmagic Designs Micro Studio Camera I wanted to use as a webcam for video conferences. Even with a 16mm sensor, it has better quality than any small sensor webcam. The only issue is all the exposure and focus controls are manual. When connected to one of their ATEM video switchers, this isn’t a problem as the ATEM provides control of all connected cameras using data sent back to the camera embedded in  the HD-SDI return video feed.

If you want to use the camera without an ATEM swtich, however, there’s no way to control the exposure without using the small awkward buttons on the front of the camera and no way to control the focus without reaching up and turning the lens’s focus ring. Being an engineer, hacker, and maker, there had to be a better way! And there was. Read on to find out more about my solution for controlling the camera. Also, it’s 100% open source and licensed under the permissive MIT license if you want to build your own.

Continue reading

Posted in Uncategorized | Comments Off on USB Knob Box Doubles as a Blackmagic Designs Camera Remote