
In part 1 of this series of posts, we built a giant set of robotic googly eyes. In part 2, we brought the googly eyes to life using an Arduino. In this post, we’ll use OpenCV to make the googly eyes detect and follow people as they move around the room. More specifically, we’ll use OpenCV to detect faces on a webcam and move the googly eyes to look roughly in the direction of the largest face in view.
Project Overview
To detect faces, we’ll use a Python script and the OpenCV open source computer vision library. The Python script and OpenCV will run on a small computer running Ubuntu Linux. The Python script will grab an image from a webcam, feed the image into one of the OpenCV face detection algorithms, and, if any faces are detected, feed a scaled version of the x coordinate of the largest detected face to the Arduino over a serial port. Finally, the Arduino will run code to move the eyeballs back and forth based on the value received from the Python script.
Required Hardware

The hardware used for this project.
OpenCV and face detection require some raw compute power. I’ve successfully used both a March 2011 Core i7 MacBook Pro 13″ running MacOS X and a May 2015 Intel Core i7 NUC running Ubuntu 14.10 to run OpenCV and the face detection algorithms for this project. I tried using a Raspberry Pi 2 with the Raspberry Pi camera as well but the latency and frame rate were just too slow to create a convincing tracking / following effect.
I’d recommend the following hardware:
- A computer with an Intel Core i5 or Core i7 laptop or desktop chip made within the last three or four years. I used an Intel Core i7 NUC with 16GB DDR and a 120GB M.2 SATA SSD.
- An HD webcam with a resolution of 1280×720 that is compatible with Linux such as the Logitech C270 that I used.
- You’ll need one free USB port for the webcam and one free USB port for the Arduino.
- The googly eyes, Arduino, and stepper motor drivers described in two earlier posts.
Required Software
An earlier version of the OpenCV face detection script running on a MacBook Pro.
The software stack required to run this project is complex and somewhat difficult to install. But once it is installed, the basic Python script that connects OpenCV to the googly eyes is only a few hundred lines of code—and most of that is from the sample code included with OpenCV. All the software required for this project is open source and available for download for free.
Here’s the required software:
- Ubuntu 14.10
- NumPy and SciPy
- OpenCV 2.4.9
- PySerial
- screen (Linux utility used as a terminal emulator)
Installing Linux
Installing Linux never goes as easily as I think it should go—especially if trying to install an older, stable version of the OS on new hardware. I ran into issues with the Intel graphics drivers for my hardware not being a part of the Ubuntu 14.10 distribution. Here’s the general procedure to install the OS:
- Download the 64-bit PC (AMD64) desktop version of Ubuntu 14.10 from http://releases.ubuntu.com/14.10/.
- Follow the instructions here to create a bootable USB thumbdrive from the downloaded .iso file. These instructions are for creating the USB thumbdrive from a Mac. Other sites have similar instruction for working from a PC or another Linux box.
- Boot from the USB thumbdrive and follow the prompts to install the OS.
Unfortunately, my graphics driver issue prevented me from installing the OS on the first try. To successfully install the OS, I had to boot the installer with the nomodeset option added to the boot options. This would allow the installer GUI to run. Once the OS was installed, I had to add the nomodeset option to the OS boot options in order to run the Intel graphics driver installer GUI. Once the drivers were installed, I had to remove the nomodeset from the OS boot options to get the full performance of the Intel graphics on the NUC.
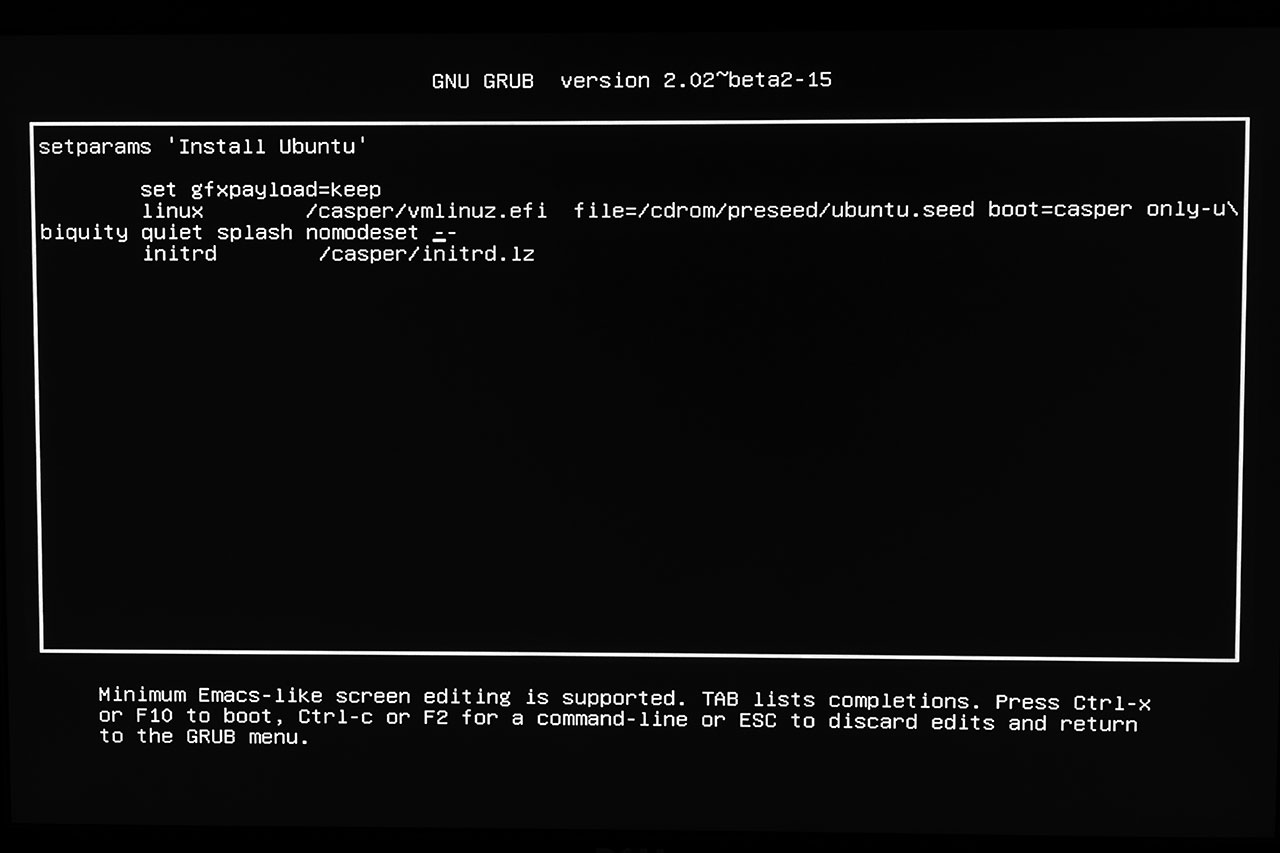
nomodeset added to the boot options during Linux installation.
To boot the installer with the nomodeset option, I followed these instructions. Bascially, boot the installer from the USB stick, and edit the boot options before starting the installer to have the nomodeset option in addition to the quiet and splash options.

Adding nomodeset to /etc/default/grub.
Once the OS was installed and booted, I edited /etc/default/grub to have the nomodeset option as well then ran sudo update-grub to propagate the changes into /boot/grub/grub.cfg. More details on this are available here. The solution BELOW the checked answer (not THE checked answer) is fairly detailed.
At this point, I updated the kernel to version 3.18.3 using these instructions and installed the Intel graphics driver. This required invoking dpkg to install the installer then running the installer itself.
Finally, I edited /etc/default/grub to remove the nomodeset option and rebuilt /boot/grub/grub.cfg with sudo update-grab. At this point my Linux box was running Ubuntu 14.10 with the 3.18.3 kernel and the 1.08 Intel graphics drivers. All was working well.
Now it was time to update the OS. Luckily that’s easy to do. Run these two commands:
- sudo apt-get update
- sudo apt-get upgrade
Installing the Webcam
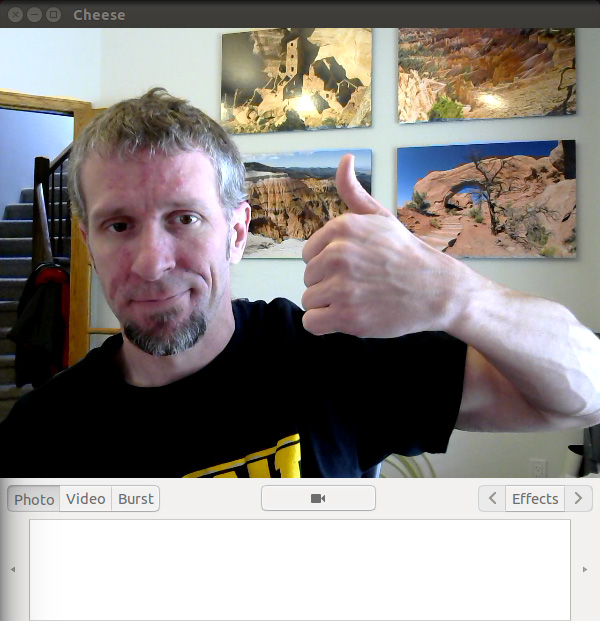
Testing the webcam using the cheese utility.
I used a Logitech C270 webcam. It was cheap. It’s HD 720p. It works with Linux. I used the cheese application to test the webcam. It can be downloaded and installed with this command.
- sudo apt-get install cheese
Once installed, type cheese at a command prompt to launch and a small window with an image from the webcam should appear on the desktop.
Installing NumPy and SciPy
The OpenCV face detection sample program requires NumPy. SciPy is useful too. Might as well install both. Instructions to install both are on this page. Follow the instructions for Ubuntu. It’s one big long command:
- sudo apt-get install python-numpy python-scipy python-matplotlib ipython ipython-notebook python-pandas python-sympy python-nose
Installing OpenCV
The next step is to download, compile, and install OpenCV version 2.4.9. The process is relatively straightforward except that FFMPEG is no longer part of the Ubuntu 14.10 distribution. Rather than try to download FFMPEG from a different source, I just compiled OpenCV without FFMPEG support.
I followed these instructions to download, compile, and install OpenCV except that I used libtiff5 instead of libtiff4 and I ran cmake with the additional option -D WITH_FFMPEG=OFF to disable FFMPEG support. This option should come before the final ‘..’ in the cmake command line.
To pick up libtiff5 instead of libtiff4, I used this command to install the opencv dependencies:
- sudo apt-get install build-essential libgtk2.0-dev libjpeg-dev libtiff5-dev libjasper-dev libopenexr-dev cmake python-dev python-numpy python-tk libtbb-dev libeigen3-dev yasm libfaac-dev libopencore-amrnb-dev libopencore-amrwb-dev libtheora-dev libvorbis-dev libxvidcore-dev libx264-dev libqt4-dev libqt4-opengl-dev sphinx-common texlive-latex-extra libv4l-dev libdc1394-22-dev libavcodec-dev libavformat-dev libswscale-dev default-jdk ant libvtk5-qt4-dev
My arguments to cmake with FFMPEG support turned off were:
- cmake -D WITH_TBB=ON -D BUILD_NEW_PYTHON_SUPPORT=ON -D WITH_V4L=ON -D INSTALL_C_EXAMPLES=ON -D INSTALL_PYTHON_EXAMPLES=ON -D BUILD_EXAMPLES=ON -D WITH_QT=ON -D WITH_OPENGL=ON -D WITH_VTK=ON -D WITH_FFMPEG=OFF ..
Accessing the Serial Port
PySerial is used to access the serial port from Python. PySerial was installed either with the rest of the OS or one of the other packages. In any event, it was already present on my system after following all the above steps.
I use the Linux utility screen as a terminal emulator. It’s useful for communicating with the Arduino outside of the Arduino development environment too. Screen is not installed by default. The following command will install it:
- sudo apt-get install screen
Finally, any user that wishes to access the serial port needs to be placed into the dialout group. This can be done using the command below where $USER is the username. Once the command is executed, the user needs to log off then log back into the system for it to take effect.
- sudo usermod -a -G dialout $USER
Woohoo! Software Installed!
That concludes the installation of the OS and all the software packages required to run the Python face detection script and communicate with the Arduino. The next steps are to install a sketch on the Arduino to move the motors in response to commands on the serial port and to run the Python face detection script.
The Arduino Sketch
The Arduino sketch listens on the Arduino’s serial port for a position for each of the eyes and then moves the motors to that position. While the motors are running, it listens for the next position and will change the destination on the fly if the previous move has not completed.
Download the Arduino sketch from my github repository here. Install the sketch on the Arduino using the Arduino IDE. If needed, post two of this series contains links to download the IDE and some tutorials.
Connect the Arduino to the Linux box and execute the following command:
- screen /dev/ttyUSB0 19200
where /dev/ttyUSB0 is the Arduino’s serial port on the Linux box. Adafruit has a good tutorial on finding the name of the serial port in case it is not /dev/ttyUSB0 on your machine. 19200 is the baud rate. It should match the baud rate set in the Arduino sketch.
If screen starts then immediately exits, your user account needs to be added the dialout group using the usermod command a few paragraphs above.
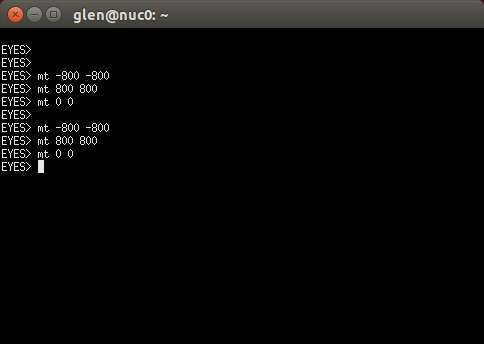
Using screen to test connectivity to the Arduino and googly eyes.
Hit return a few times and you should get a prompt that says “EYES>.” Connect the motor power supply and execute the following commands:
- mt -800 -800
- mt 800 800
- mt 0 0
The motors should move a 1/4 turn CW, a half turn CCW, and finally a 1/4 turn CW and return to their initial position. Type CTRL-A then k to exit screen.
The Python Face Detection Script
In opencv-2.4.9/samples/python2, there’s a Python face detection script called facedetect.py. My script is based off this sample code. To run the sample as is, cd to opencv-2.4.9/samples/python2 then run:
- python facedetect.py
A window should launch showing live video from the webcam. Green rectangles should appear around any faces in the video. Blue rectangles should appear around nested eyeballs. Hit escape to exit.
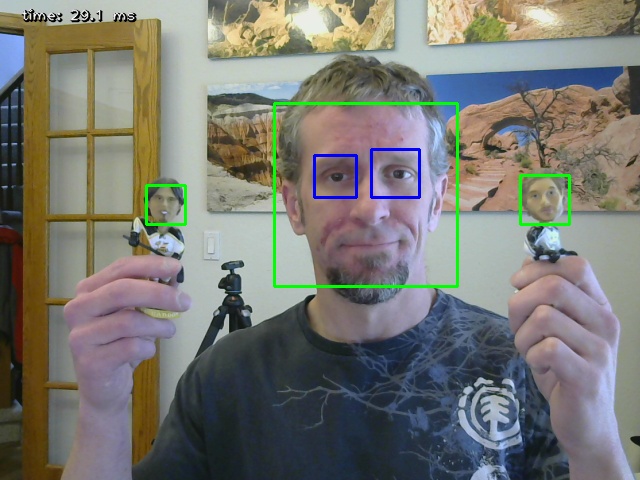
Output of the default facedetect.py script. Detected faces are highlighted in green. Detected nested eyeballs are highlighted in blue.
I made the following changes to the script to make it work with the Arduino and the googly eyes:
- Adjust video size — Capture the input video at the full resolution of the webcam.
- Delete nested object detection — We don’t need to detect eyeballs.
- Mirror the video — It’s a bit easier to walk around and watch what is happening with a mirror image vs a normal image so I used fliplr to flip the webcam image before displaying it.
- Find the biggest face — What happens when multiple people are in the frame? I modified the code to calculate the areas of all the faces found and use the largest face. All the faces are highlighted in green and the face used for the position of the eyes is highlighted in red.
- Send motor positions out the serial port — The final modification is to take the x value of the center of the red rectangle, scale it to the range -800 to +800, and send the scaled position out the serial port.
Create a new directory, cd to it, and download my script to it from my github repository here. The script is dependent on several files that are in the python2 samples directory. Copy the following files so they are in the same directory as the file fd2.py:
- opencv-2.4.9/samples/python2/common.py
- opencv-2.4.9/samples/python2/video.py
- opencv-2.4.9/data/haarcascades/haarcascade_frontalface_alt.xml
Connect the Arduino, adjust the pupils so they are looking straight down, and power up the motor drivers. Now launch the Python script using the following command. Be sure to replace /dev/ttyUSB0 with the actual name of the serial port connected to the Arduino.
- python fd2.py –serial /dev/ttyUSB0
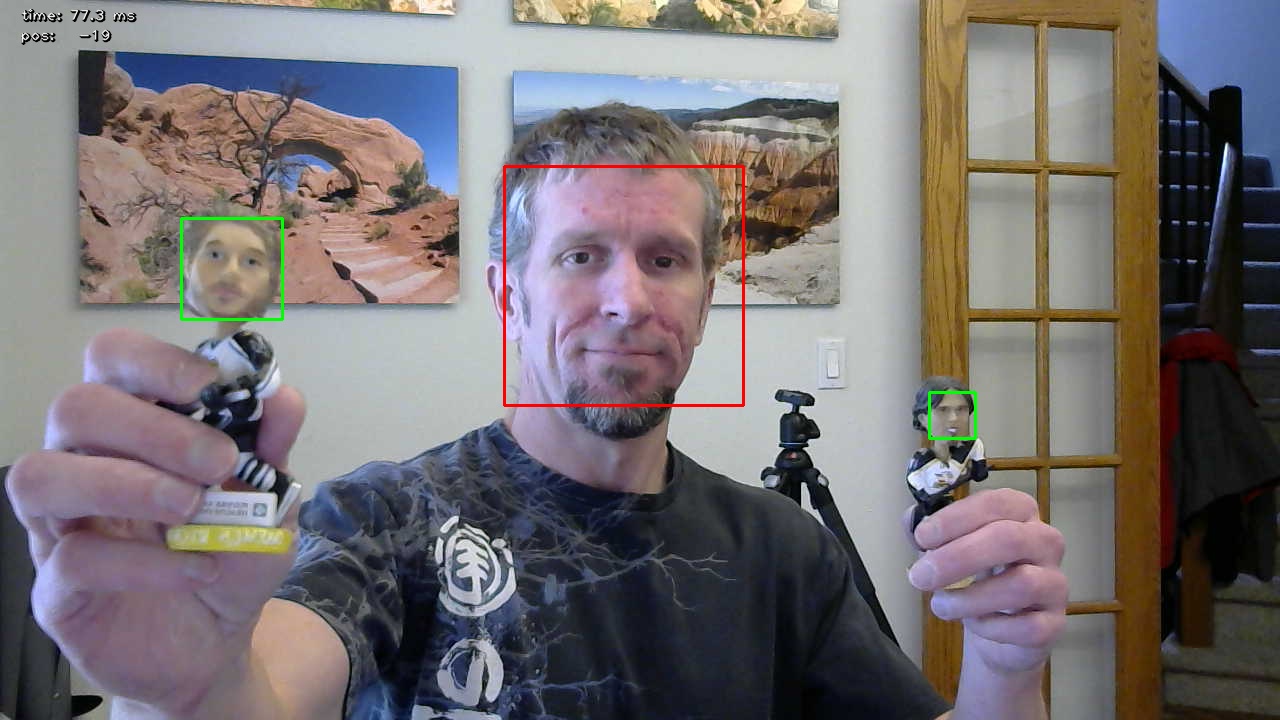
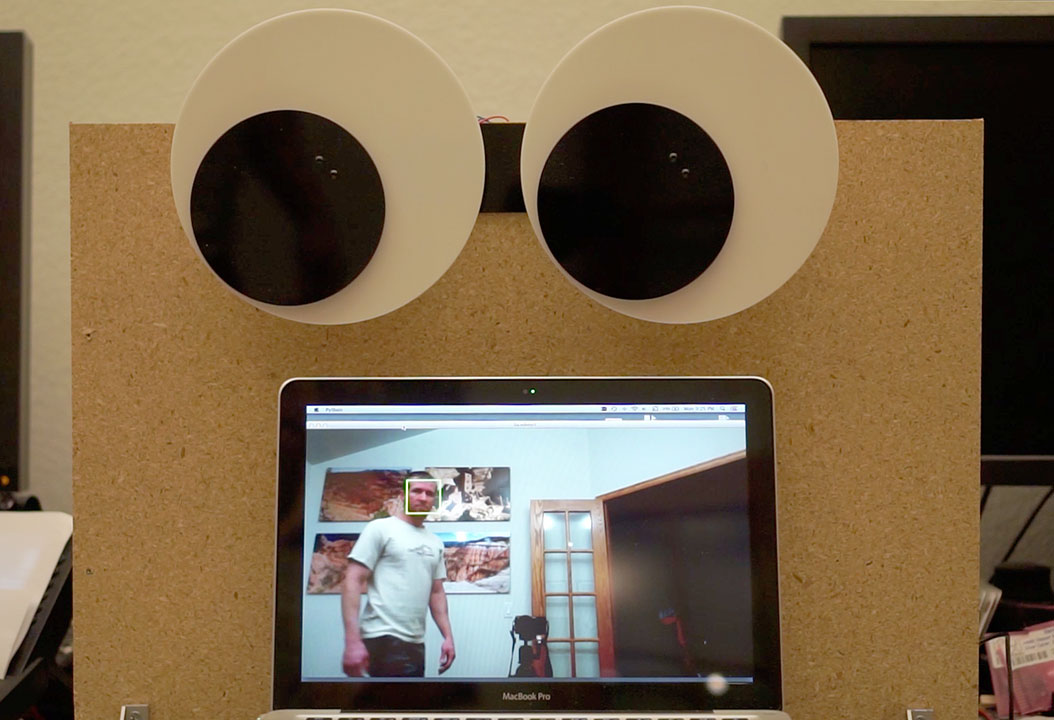
Output of the modified face detection python script. The largest face is used to position the eyeballs and is highlighted in red with any smaller faces highlighted in green. The time to process the image and the position value sent to the Arduino are displayed in the upper left hand corner.
With any luck, the webcam video is displayed on the screen, the largest face is highlighted with a red rectangle, any extra faces are highlighted with green rectangles, and the googly eyes move back and forth tracking the face highlighted in the red rectangle.
The Results
In case you missed the YouTube video at the top of the post, here it is again:
The video shows me walking back and forth across the room while the eyes follow me. The monitor in the video shows a mirrored image from the webcam with my face highlighted.