
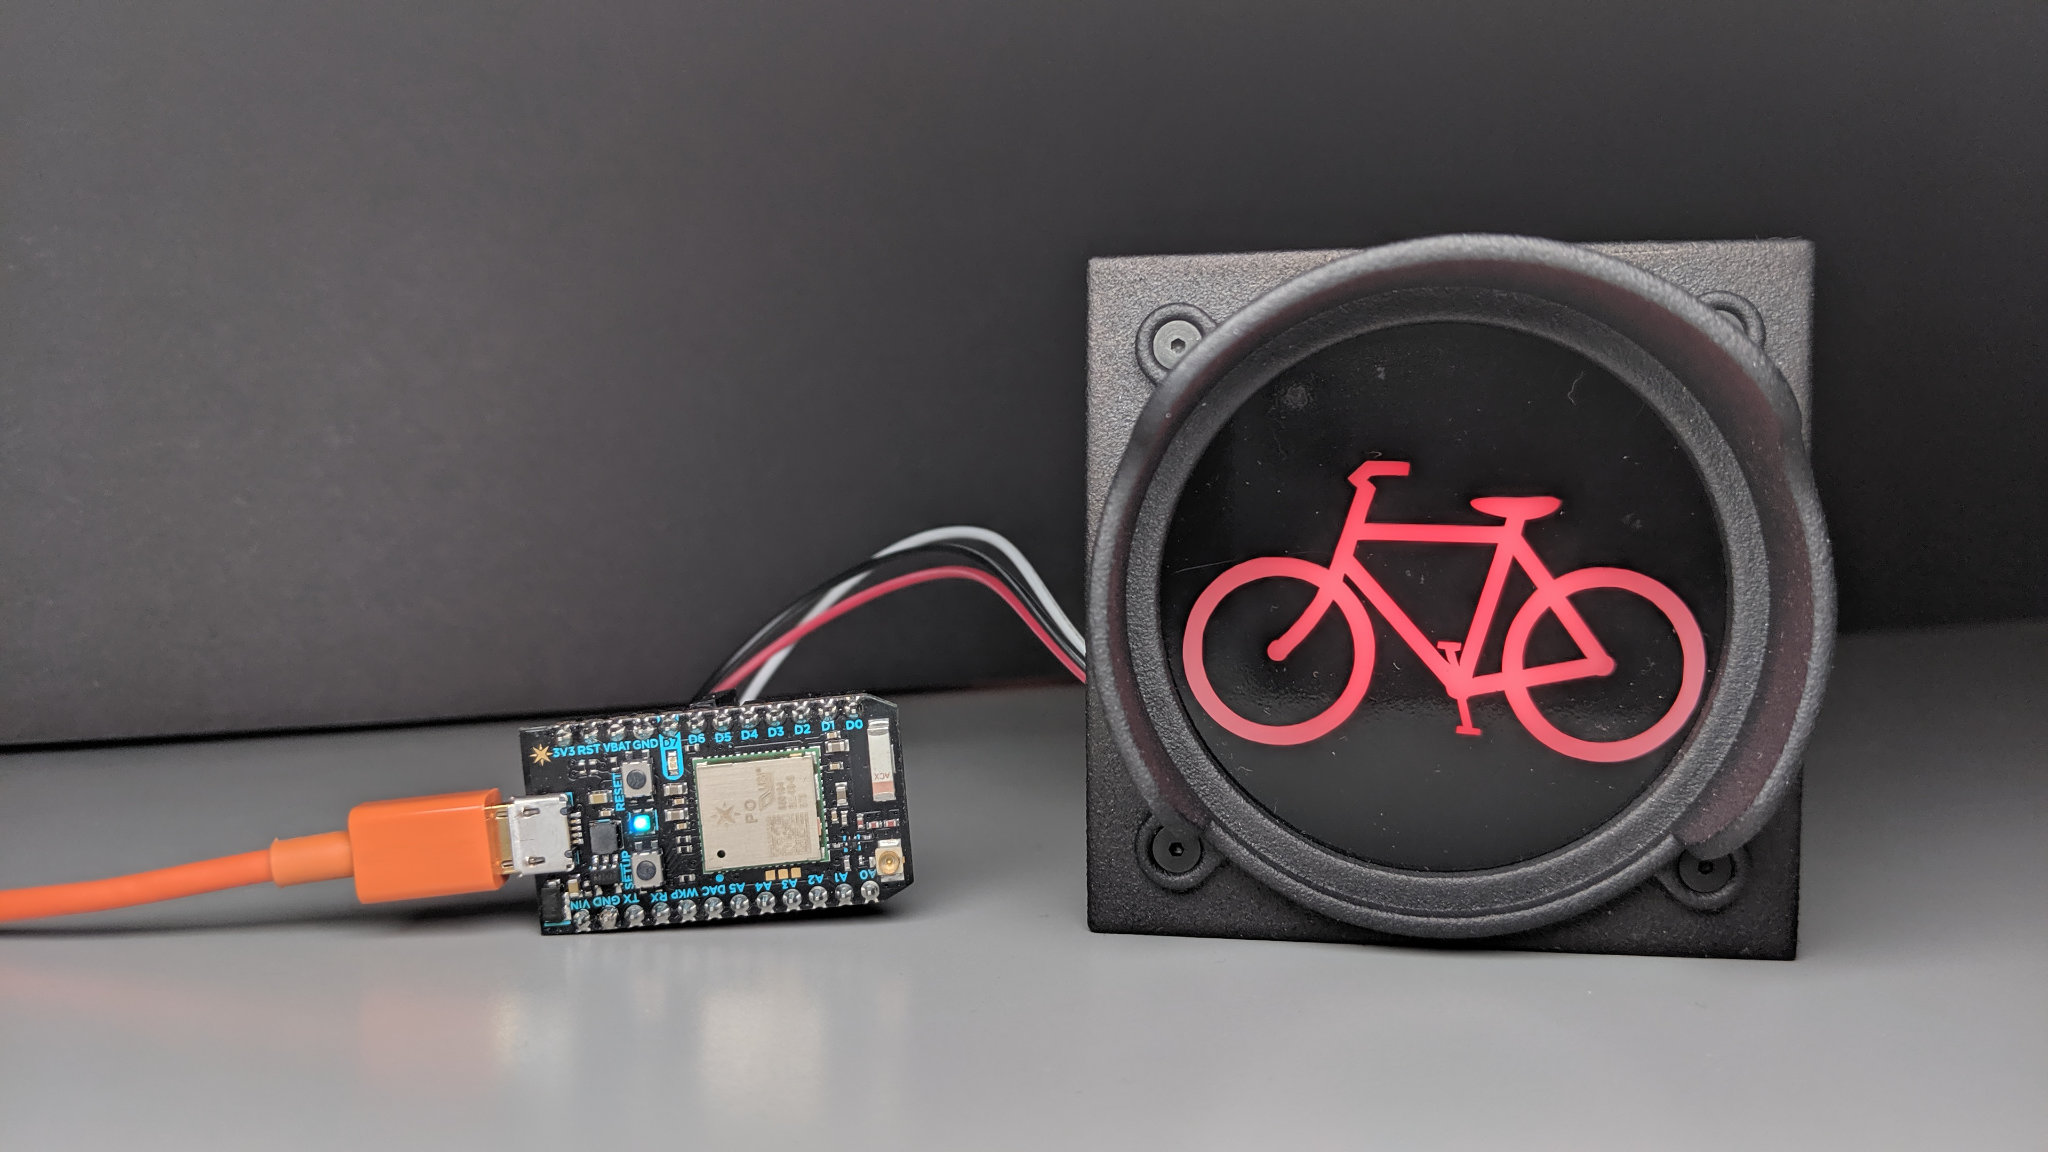
Control the bicycle traffic signal over Wi-Fi using a Particle Photon.
In the first post in this series, we built a miniature LED bicycle traffic signal using 3D printing, laser cutting, a sticker, and an Adafruit Neopixel Jewel. In this post, we’ll look at bringing the signal to life using a Particle Photon. We’ll start with basic code to blink the traffic signal green, yellow, and red then add code to control the color over the web using the Particle Cloud or locally using an iPad and the Art-Net protocol.
Prerequisites
Before getting started, I highly recommend running through the Particle Photon blink example including the section on controlling the LED over the Internet and reading through the Adafruit Neopixel Überguide. These two references should give you a good understanding of how the Particle Photon cloud-based development environment works, how to interact with your hardware using the Particle Cloud, and how Neopixels work.
Hardware Connections
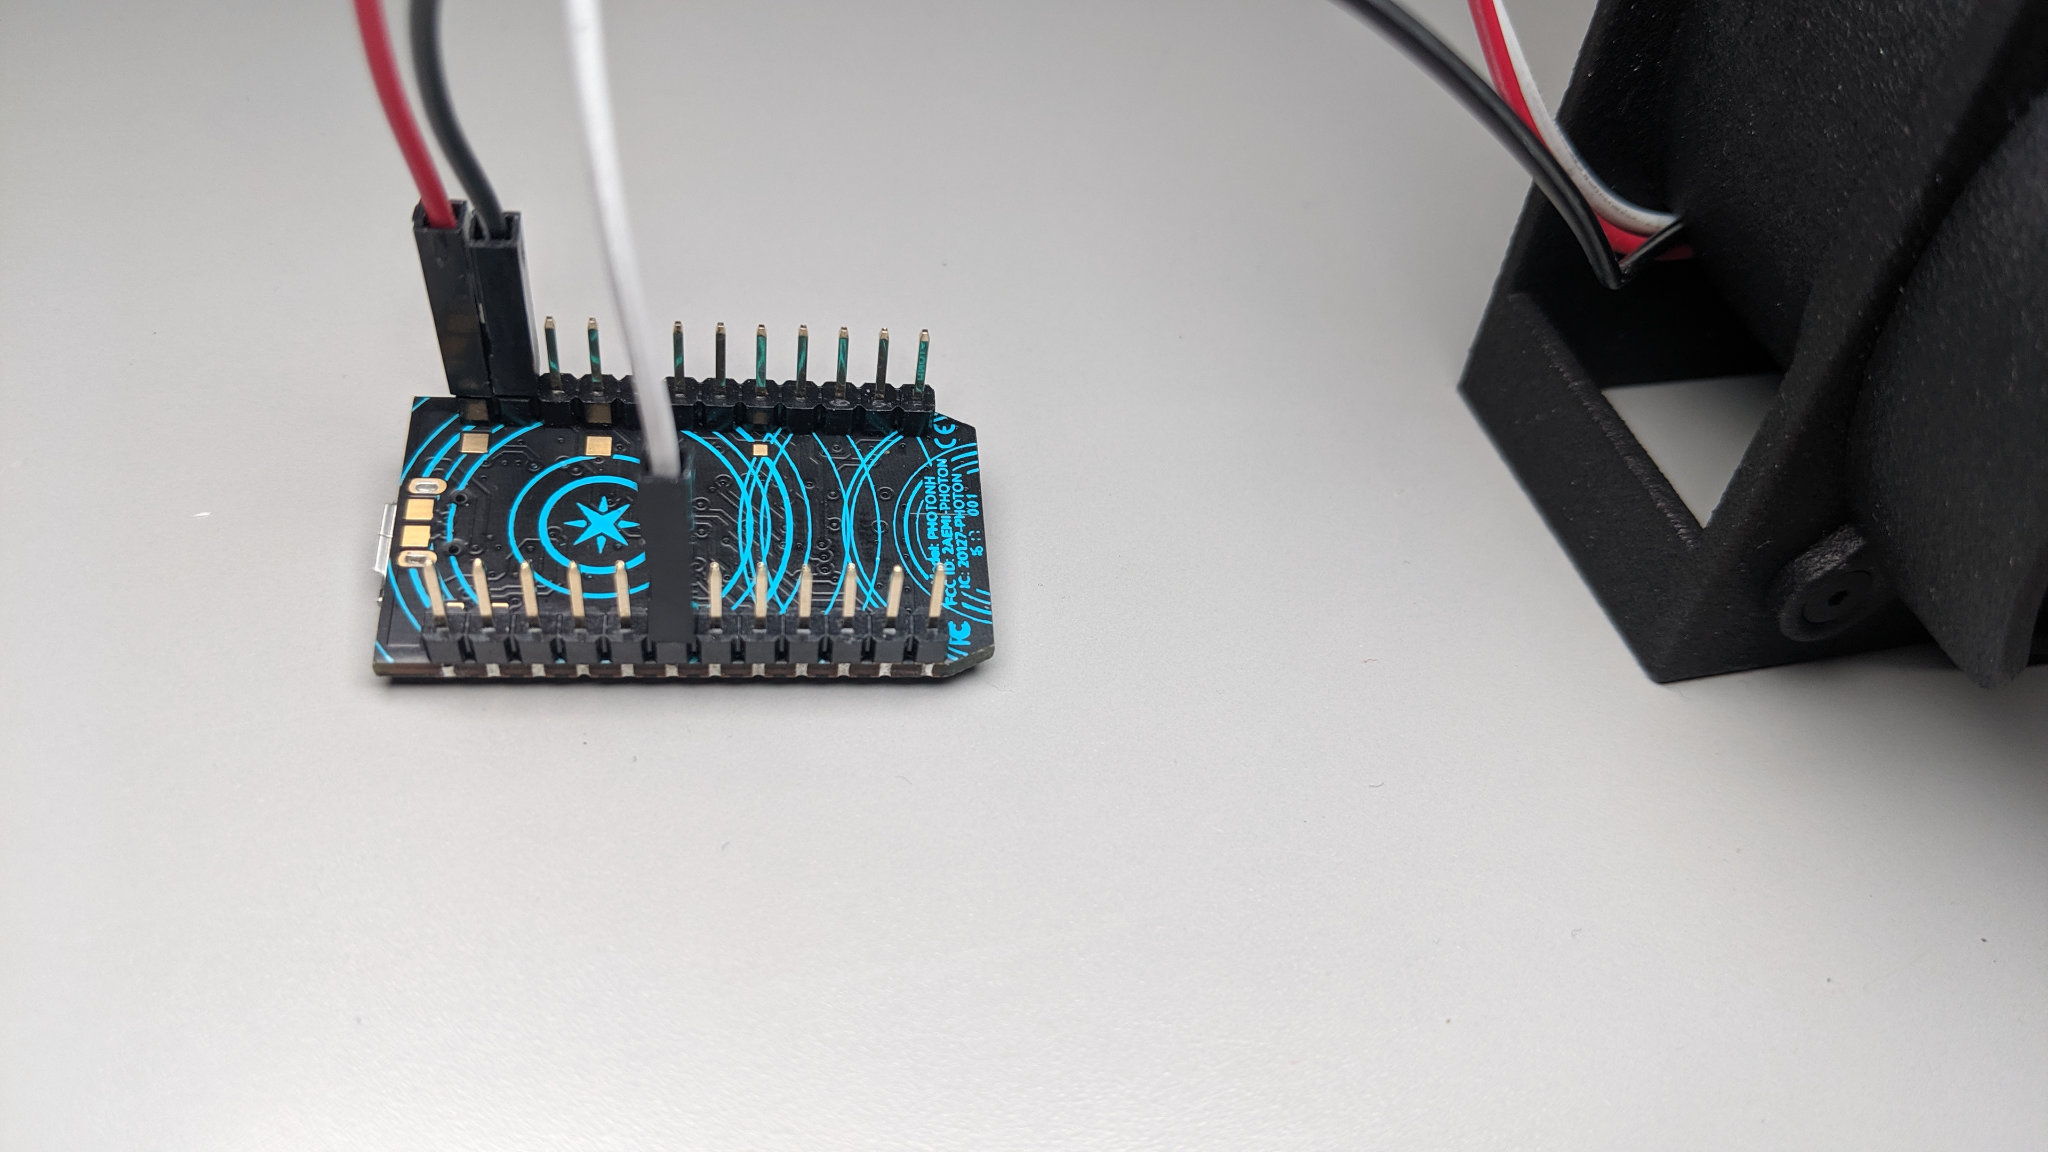
The traffic signal connections to the Particle Photon. The USB connector is on the left in this photo.
The traffic signal only requires three connections to the Particle Photon to operate. Unplug the Photon’s USB power and connect the signals in the table below between the traffic signal and the Photon. Once the wires are connected and double checked, reconnect the Photon’s USB power.
| Photon Pin | Neopixel Pin | Wire Color |
|---|---|---|
| VIN | PWR | RED |
| GND | GND | BLACK |
| D6 | DIN | WHITE |
Cycle the Signal’s Colors
For the first project, let’s verify the hardware by simply cycling the signal’s colors from green to yellow to red and back again in a loop. Open up the Particle on-line compiler and create a new project. I named my project traffic-signal-01. Hit Ctrl-S or Command-S to save the project.
Once the new project is created and saved, click the ribbon library button to add a library to the project. Search for the neopixel library. The correct library has a checkmark next to it and 1.5 million + uses. Click the library name then click the include in project button then click the name of the project you just created then click confirm.
Delete the include, empty setup, and empty loop functions from the existing code then paste in the following code:
SYSTEM_THREAD(ENABLED);

#include <neopixel.h>

#define PIXEL_COUNT   7
#define PIXEL_PIN     D6
#define PIXEL_TYPE    WS2812B

Adafruit_NeoPixel strip = Adafruit_NeoPixel (PIXEL_COUNT, PIXEL_PIN, PIXEL_TYPE);

int waitTime = 500;
int state = 0;
int i;

void setup ()
{
    strip.begin ();
    strip.show ();
}

void loop ()
{
    if (state == 0) {
        for (i=0; i < PIXEL_COUNT; i++) {
            strip.setPixelColor (i, 0x00, 0xff, 0x00); // green
        }
    } else if (state == 1) {
        for (i=0; i < PIXEL_COUNT; i++) {
            strip.setPixelColor (i, 0xa0, 0x60, 0x00); // yellow
        }
    } else if (state == 2) {
        for (i=0; i < PIXEL_COUNT; i++) {
            strip.setPixelColor (i, 0xFF, 0x00, 0x00); // red
        }
    }
    state++;
    if (state > 2) {
        state = 0;
    }
    strip.show ();
    delay (waitTime);
}
The SYSTEM_THREAD(ENABLED) line causes the execution of the code to begin immediately without waiting for the Photon to join the local Wi-Fi network or connect to the Particle Cloud. Since we’re just sitting in a loop blinking some LEDs, there’s no need to wait for a network connection.
Select the target device by clicking the target icon then clicking the star next to the device to program. Click the lightning button to compile the code and program the flash memory on the target device. With any luck, the traffic signal is now cycling through the green, yellow, and red colors in that order.
Control Over the Particle Cloud
To control the traffic signal over the Internet, we’re going to use the Particle.function API call to register a function in our code with the Particle Cloud. That function can then be called remotely using an HTTP POST to Particle’s cloud infrastructure. When the function is called, we receive a string, the function in our code executes, then we return an integer to indicate our status. Here’s the example taken from the API documentation page:
// SYNTAX
bool success = Particle.function("funcKey", funcName);

// Cloud functions must return int and take one String
int funcName(String extra) {
  return 0;
}
We need to do a couple of things in our code:
- Register our function with the Particle cloud.
- Receive a string containing a hexadecimal color value.
- Parse the string into a 24-bit color value.
- Gamma correct the red, green, and blue components of the color separately.
- Set the Neopixels to the gamma-corrected color value.
- Return a result code to indicate success (0).
Now let’s write the code. Create another new project and hit Ctrl-S to save it. I named this project traffic-signal-cloud. Repeat the process in the previous project to add the Neopixel library to the project.
Delete the include, empty setup, and empty loop functions from the existing code then paste in the following code:
// includes
#include <neopixel.h>

// neopixel defines
#define PIXEL_COUNT   7
#define PIXEL_PIN     D6
#define PIXEL_TYPE    WS2812B

// success / failure defines
#define SUCCESS 0
#define FAILURE -1

// function prototypes
int SetSignalColor (String command);

// globals
Adafruit_NeoPixel strip = Adafruit_NeoPixel (PIXEL_COUNT, PIXEL_PIN, PIXEL_TYPE);

// gamma correction table
const uint8_t gamma8[] = {
    0,  0,  0,  0,  0,  0,  0,  0,  0,  0,  0,  0,  0,  0,  0,  0,
    0,  0,  0,  0,  0,  0,  0,  0,  0,  0,  0,  0,  1,  1,  1,  1,
    1,  1,  1,  1,  1,  1,  1,  1,  1,  2,  2,  2,  2,  2,  2,  2,
    2,  3,  3,  3,  3,  3,  3,  3,  4,  4,  4,  4,  4,  5,  5,  5,
    5,  6,  6,  6,  6,  7,  7,  7,  7,  8,  8,  8,  9,  9,  9, 10,
   10, 10, 11, 11, 11, 12, 12, 13, 13, 13, 14, 14, 15, 15, 16, 16,
   17, 17, 18, 18, 19, 19, 20, 20, 21, 21, 22, 22, 23, 24, 24, 25,
   25, 26, 27, 27, 28, 29, 29, 30, 31, 32, 32, 33, 34, 35, 35, 36,
   37, 38, 39, 39, 40, 41, 42, 43, 44, 45, 46, 47, 48, 49, 50, 50,
   51, 52, 54, 55, 56, 57, 58, 59, 60, 61, 62, 63, 64, 66, 67, 68,
   69, 70, 72, 73, 74, 75, 77, 78, 79, 81, 82, 83, 85, 86, 87, 89,
   90, 92, 93, 95, 96, 98, 99,101,102,104,105,107,109,110,112,114,
  115,117,119,120,122,124,126,127,129,131,133,135,137,138,140,142,
  144,146,148,150,152,154,156,158,160,162,164,167,169,171,173,175,
  177,180,182,184,186,189,191,193,196,198,200,203,205,208,210,213,
  215,218,220,223,225,228,231,233,236,239,241,244,247,249,252,255 };

// setup
void setup ()
{
    // register our function with the particle cloud
    Particle.function ("SetSignalColor", SetSignalColor);

    // initialize and clear Neopixels
    strip.begin ();
    strip.show ();
}

// loop
void loop ()
{
    // nothing to do here
}

// SetSignalColor
int SetSignalColor (String command)
{
    // local variables
    int i;
    uint32_t color;
    uint8_t r, g, b;

    // convert received string to a 24-bit RGB color value
    color = strtoul (command, NULL, 16);

    // pull out RGB values and gamma correct them
    r = gamma8[(color >> 16) & 0xff];
    g = gamma8[(color >>  8) & 0xff];
    b = gamma8[(color >>  0) & 0xff];

    // set pixel colors
    for (i=0; i < PIXEL_COUNT; i++) {
        strip.setPixelColor (i, r, g, b);
    }

    // show pixels
    strip.show ();

    // woohoo! we made it. return success status code.
    return SUCCESS;
}
The first big change in this code is that the SYSTEM_THREAD(ENABLED) directive is gone. This change was required because we need to be connected to the Wi-Fi network and the Particle Cloud to make our function executable over the Internet. Next up, we added a prototype for our SetSignalColor function and registered this function with the Particle Cloud inside setup. The loop function is empty too because we’re now going to do all our heavy lifting inside the SetSignalColor function.
The SetSignalColor function first converts the string of hex digits to an unsigned integer. The function then pulls the 8-bit red, green, and blue values out of the integer and gamma corrects the values. It then sets the colors of the pixels in the strip to the gamma corrected values, shows the pixels, and returns the SUCCESS status code. Select the target Photon again and then click the lightning bolt to compile and program the targeted Photon with the new code.
Calling using the Particle Console
Now that the code is compiled and flashed to the Particle Photon, we need to test it. The easiest way to test the code is to use the Particle Console. Once the console is open, click the ID of the Photon connected to the traffic signal.
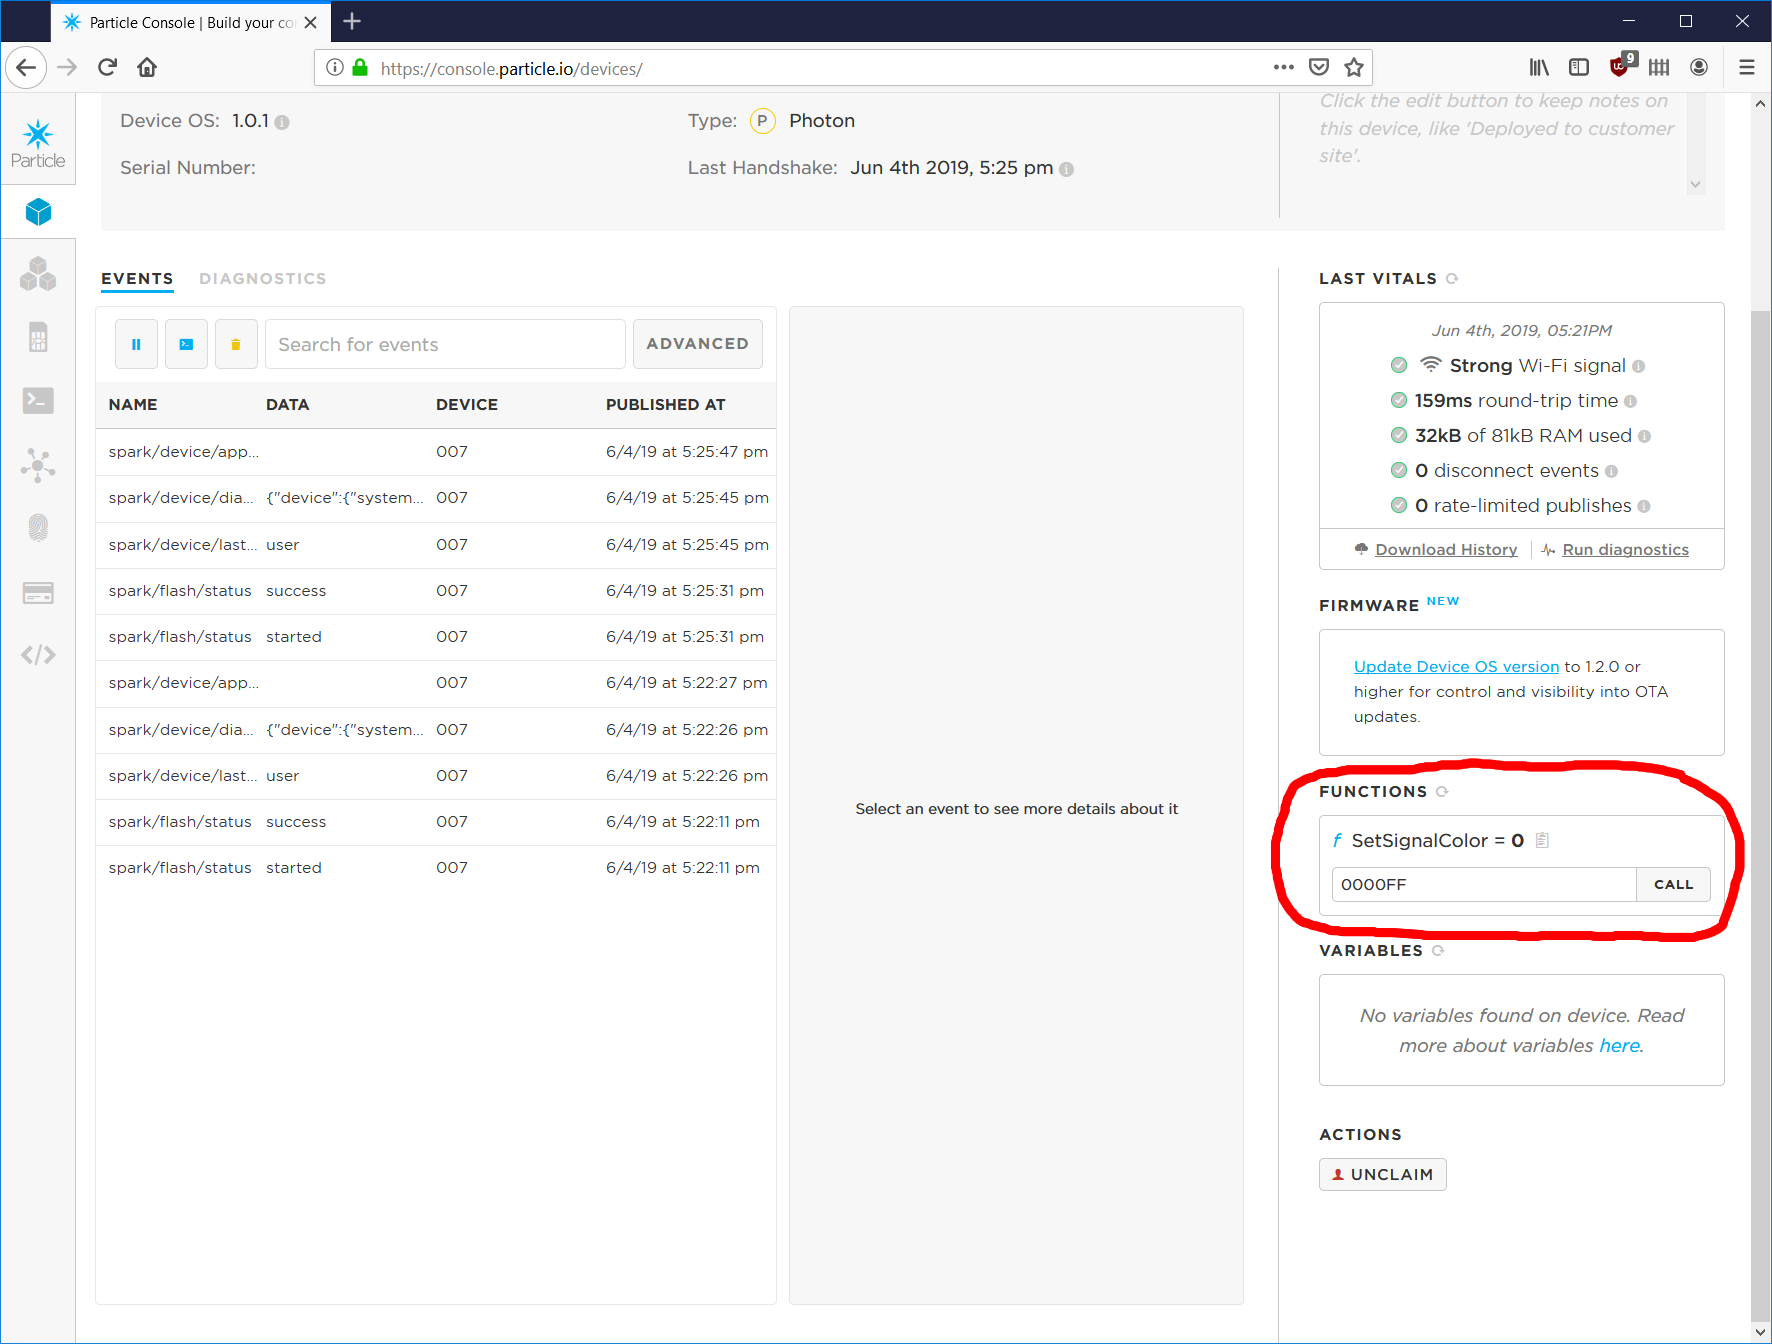
The location of the SetSignalColor function box in the Particle Console for this Photon. This sets the signal to blue.
On the new page, locate the SetSignalColor function in the right-hand column. Type a hex color value, e.g., ff0000 for red, into the SetSignalColor box and click CALL. The signal should now be red. Experiment with a few more color values including some that are formatted incorrectly. Check the result code in the same box. Once you’re happy everything is working, let’s try to control the traffic signal from the command line using CURL and in an IFTTT recipe.
Calling using CURL
Let’s try changing the color of the signal using the curl command. To do this, you need to know the name of your function, your Photon’s unique device ID, and the access token associated with your account. The name of the function is SetSignalColor. The device ID is the long string of mostly numbers that ID’s each of your Photons in the Particle console. You clicked on it in the previous step to get to the View Device page for your Photon.
The access token is a bit more difficult to find. Go to the Particle online IDE window where you edited your code and click on the gear icon to access the settings page. The access token is the long string of letters and numbers labeled Personal Access Token. If one doesn’t exist, click Reset Token to generate one.
The curl command to change the signal color is:
curl https://api.particle.io/v1/devices/<your device id>/SetSignalColor/ -d access_token=<your access token> -d arg=<hex color string>
Replace <your device id> and <your access token> with your device id and access token respectively. At the end of the line, replace <hex color string> with the color for the signal. For example 0000FF would make the signal blue. Cross your fingers and hit return. Hopefully, the traffic signal is now your selected color.
Calling using IFTTT
If you link your IFTTT account to your Particle account, you can use IFTTT to turn the signal on and off in response to events on IFTTT. For this example, I’m going to link Fort Collins Utilities’ conservation events to the traffic signal. The electric utility publishes a start event when demand is expected to exceed a certain threshold and recommends that customers postpone using heavy electric loads during the peak demand period. The electric utility also publishes a stop event when the peak demand period is over. I want the traffic signal to turn red at the start of the conservation event and green at the end of the conservation event.
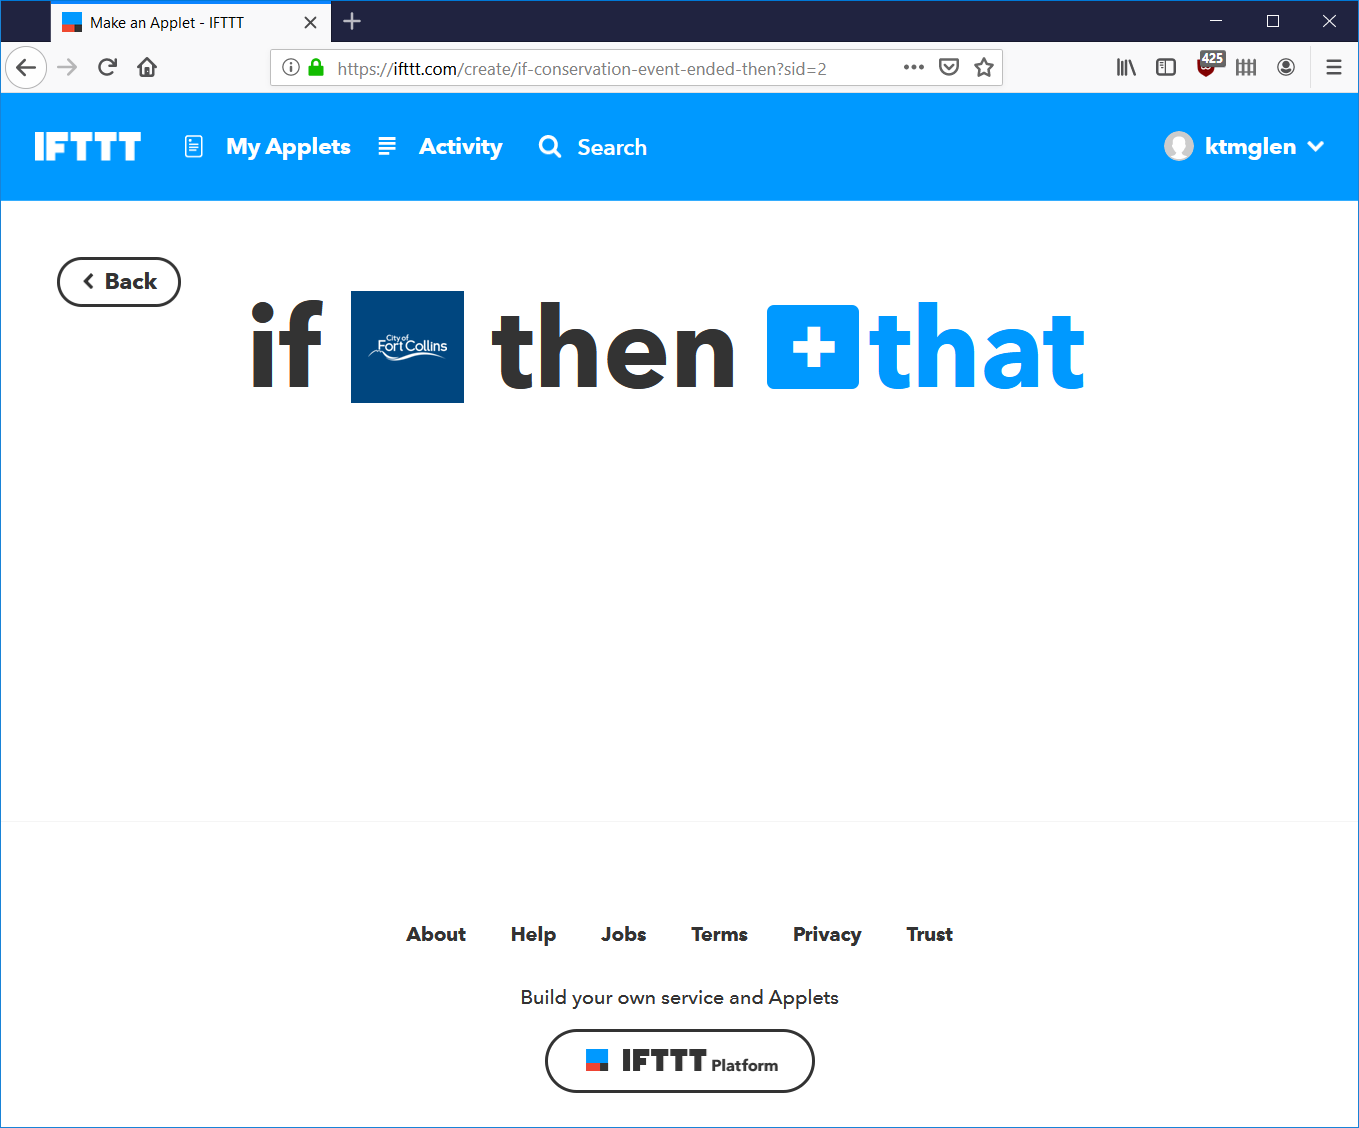
In IFTTT, click My Applets then click New Applet. Now follow these steps:
1) Click +this.

2) Choose a service. I selected Fort Collins Utilities Conservation Events.
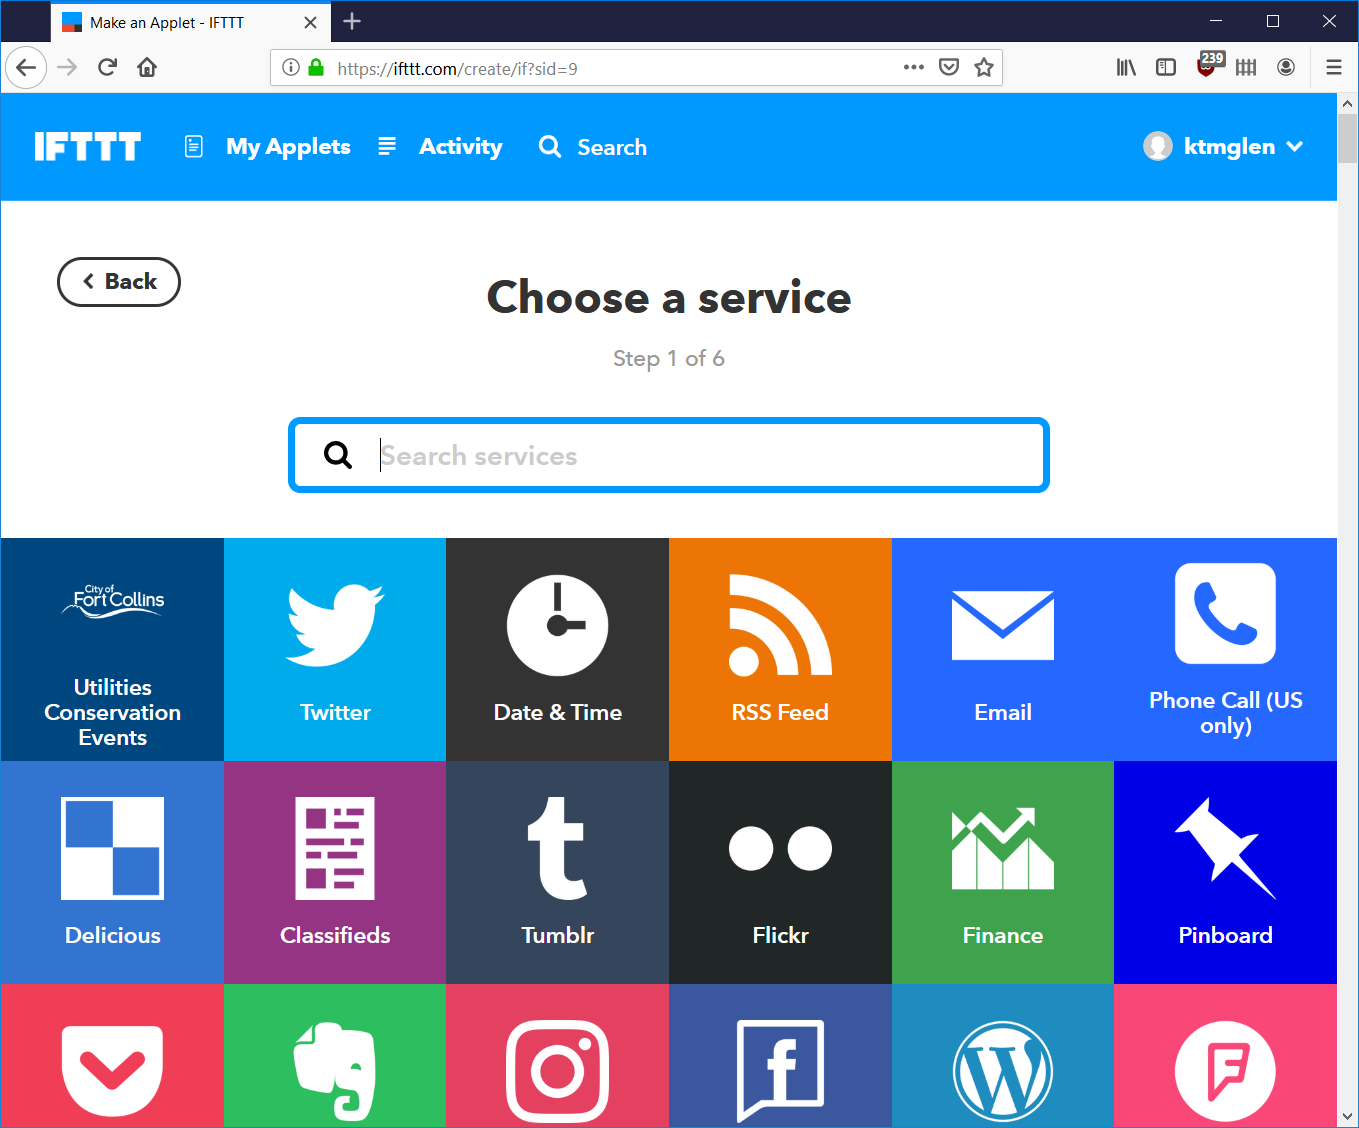
3) Click the trigger. I chose Conservation Event Started.
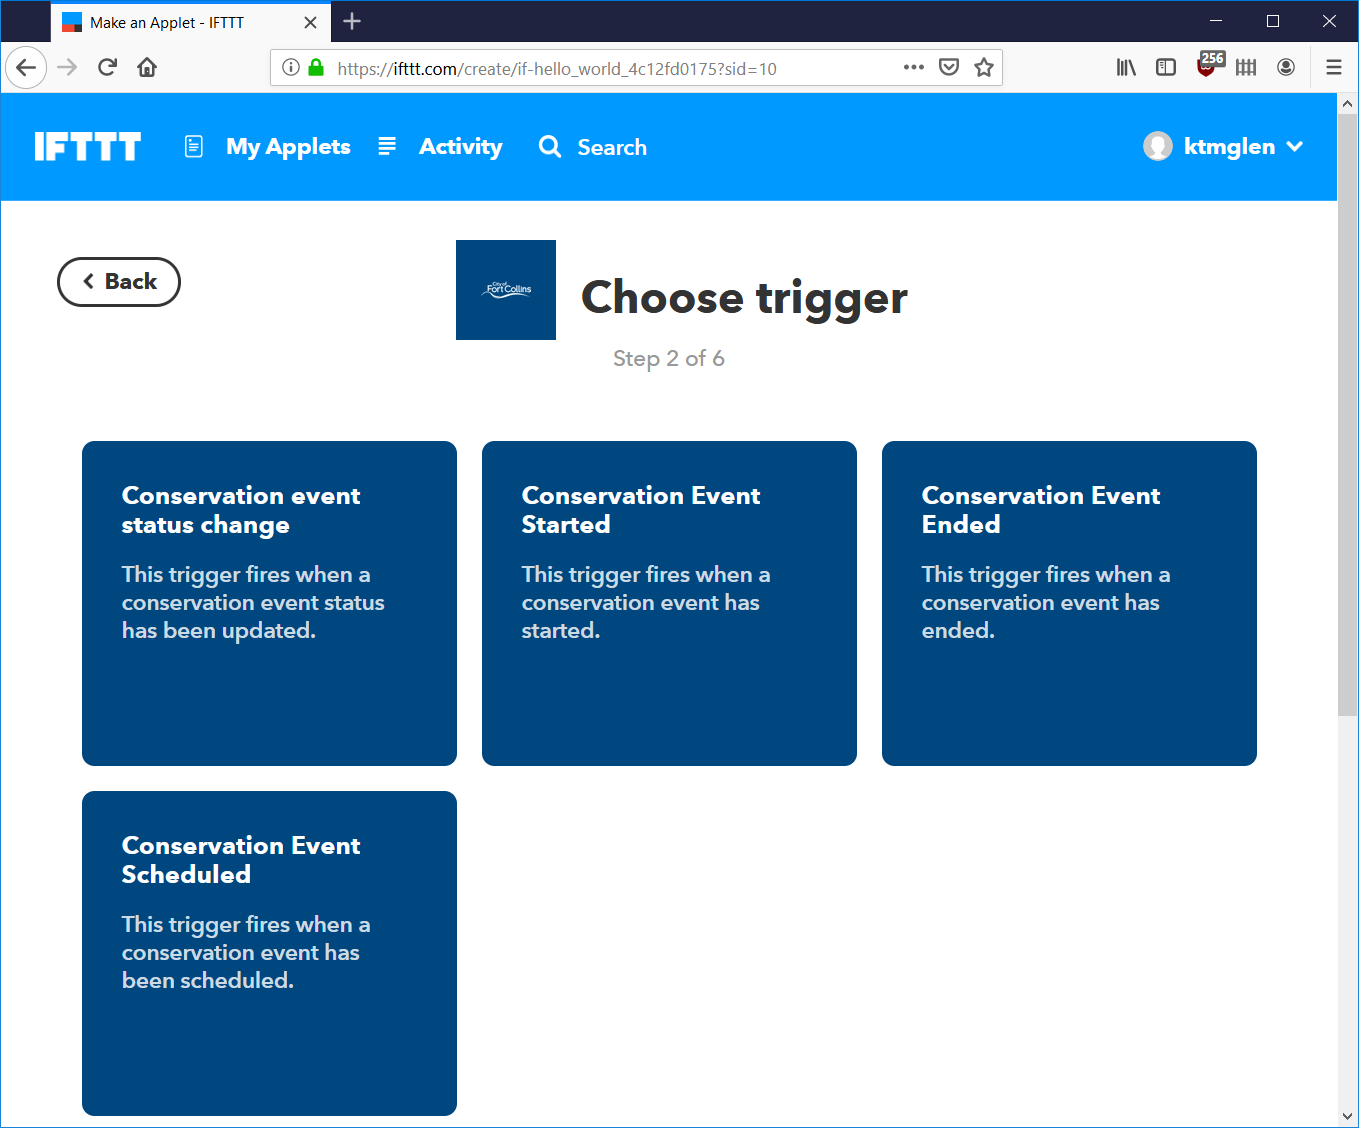
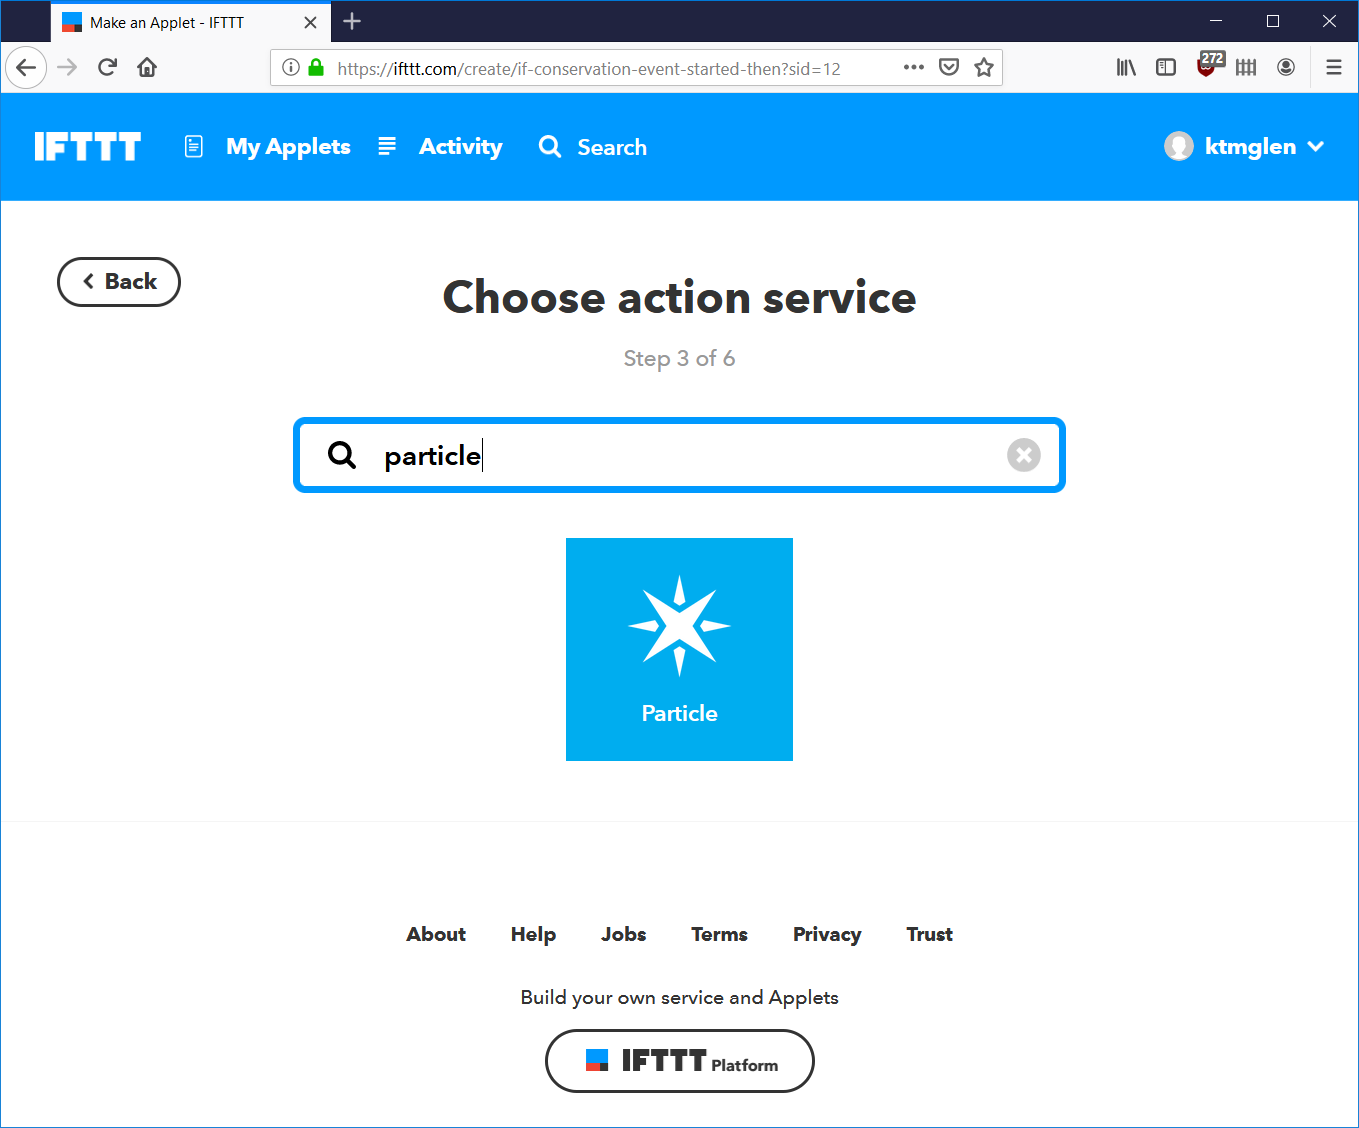
4) Click +that.
5) Search for and click on Particle.
6) Click Call a function.
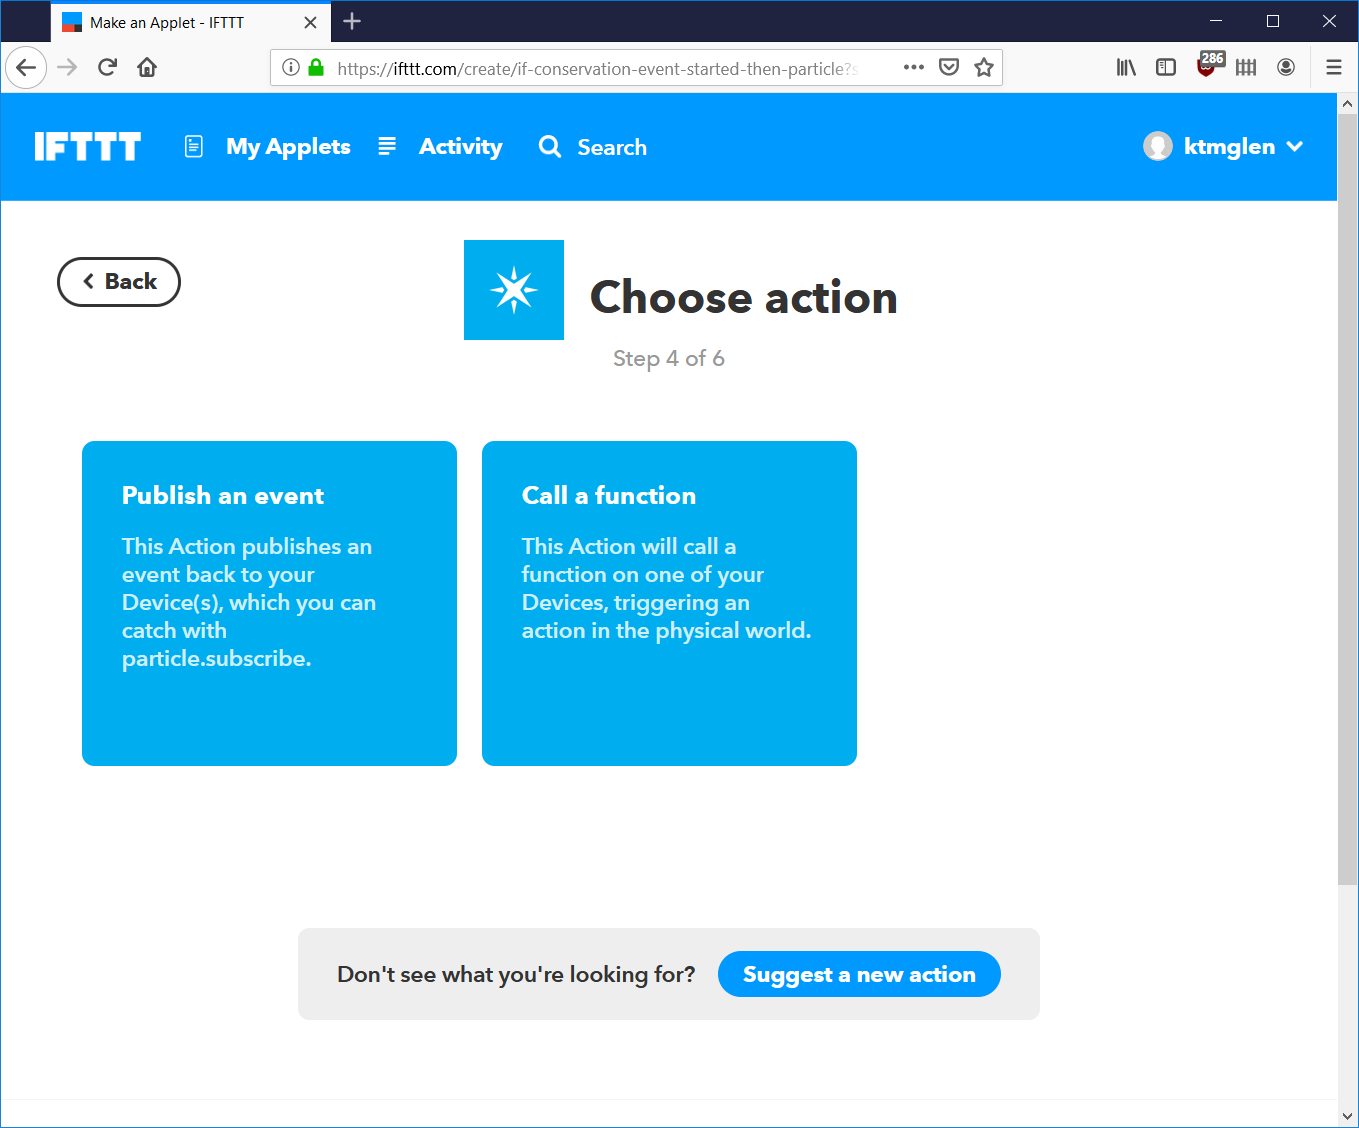
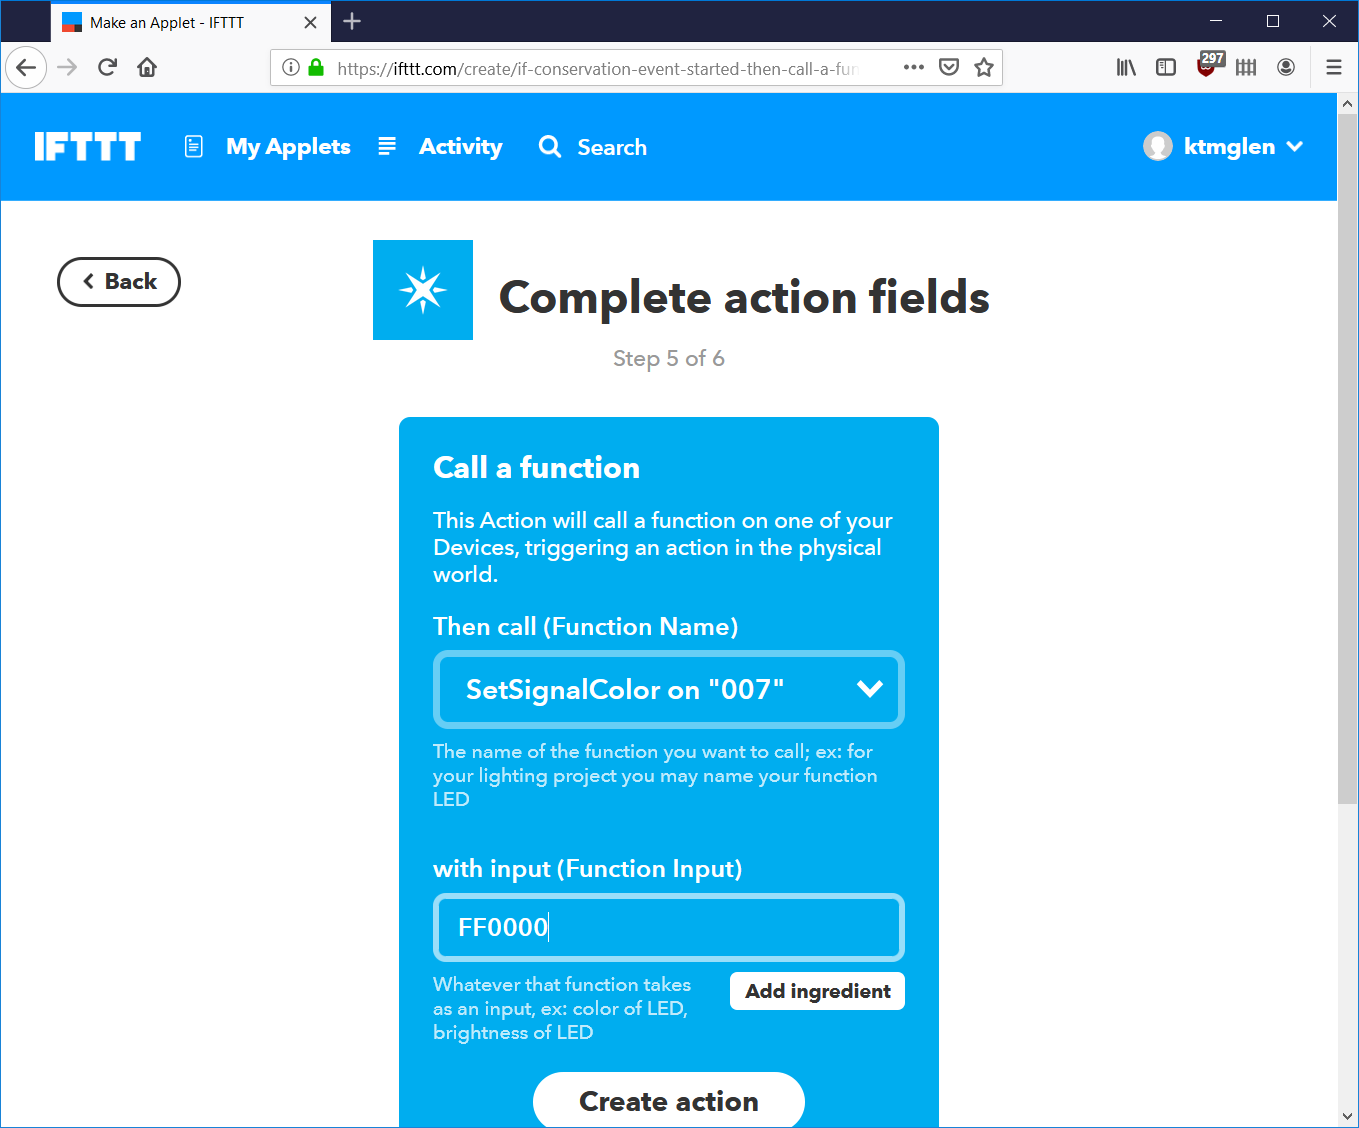
7) Select SetSignalColor on your Photon’s name, enter the hex RGB color for the signal, and click Create action. I used FF0000 for red.
8) Click Finish.
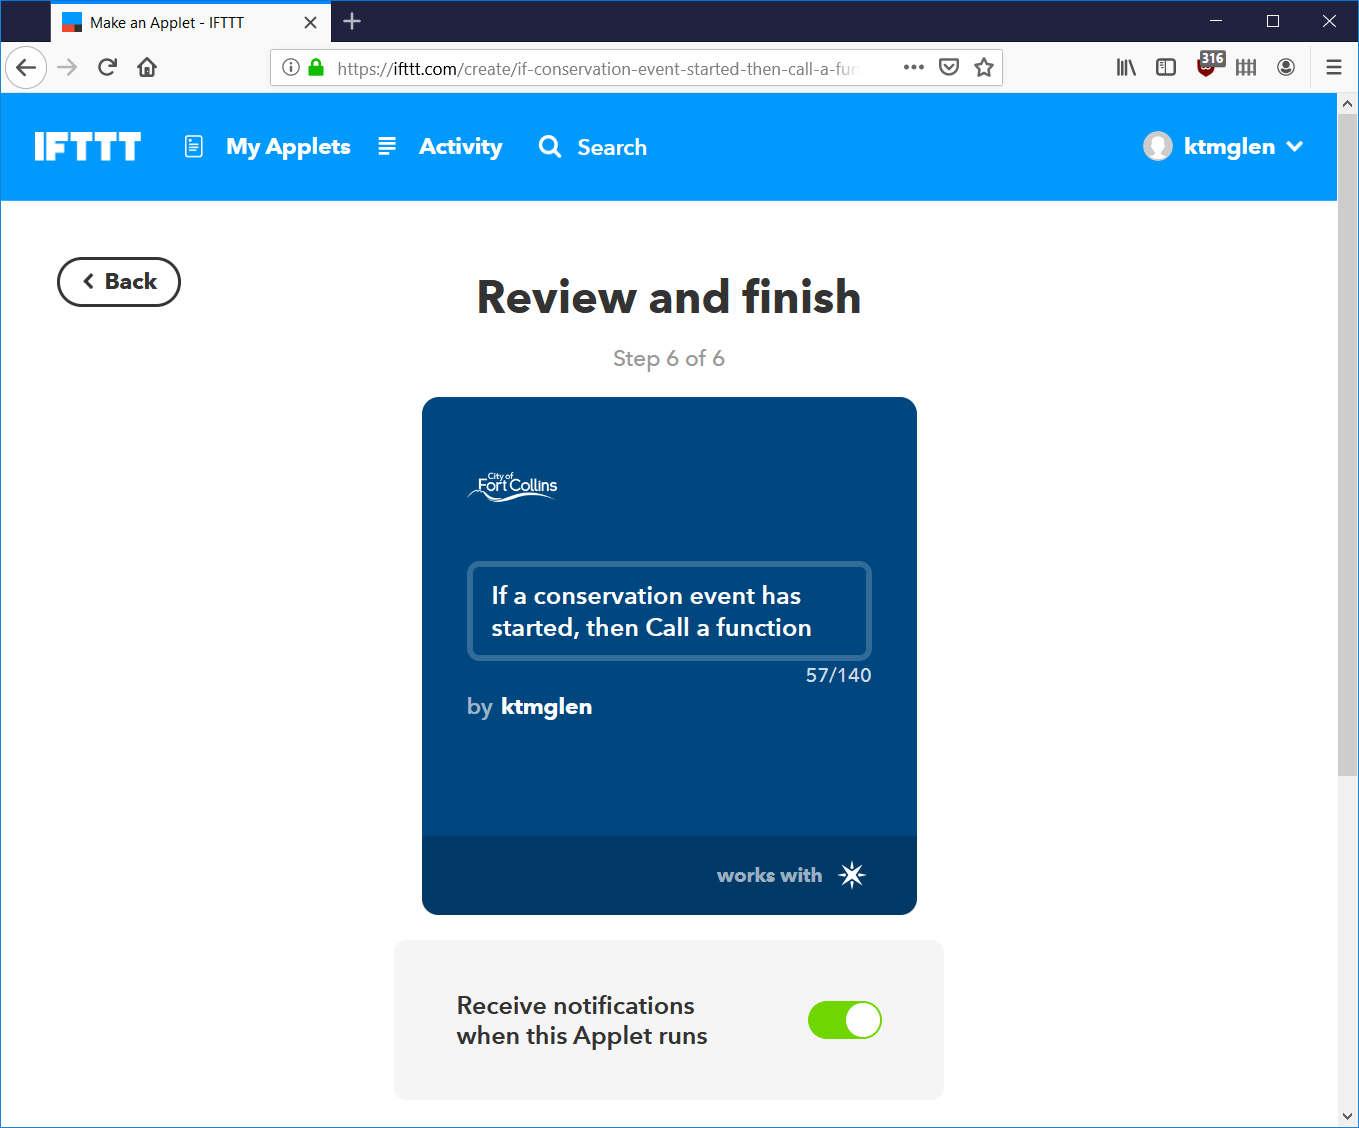
Repeat the above process for any other events that need to set the signal to a color. I created a second applet that turns the signal green again when the conservation event is over. Now when the selected triggers occur on IFTTT, the traffic signal will change to the selected colors.
Control Over the Local Network

Controlling the traffic signal color via Art-Net and Luminair 3 on an iPad Mini.
In this next example, I want to use some professional lighting control applications running on an iPad to control the color of the signal. The two applications I would like to use are Photon and Luminair. Both of these applications can control theatrical, club, and architectural lighting using the Art-Net protocol.
The Art-Net protocol sends channels of lighting levels from a controller to one or more lighting fixtures over Wi-Fi or Ethernet using the UDP protocol. If I want to use these apps, I need to make my Photon understand UDP and Art-Net. Fortunately that’s easy to do using the built-in UDP functions and a 3rd party Art-Net receiver library.
In the Particle online IDE, create a new project, save the project, and add the neopixel library to the project as done in the previous sections. Once that’s done, search for the Particle-Artnet library by Stef-Sijben and add that to the current project. The process is the same as for the neopixel library. Here’s the code:
// includes
#include <neopixel.h>
#include <Artnet.h>

// neopixel defines
#define PIXEL_COUNT   7
#define PIXEL_PIN     D6
#define PIXEL_TYPE    WS2812B

// success / failure defines
#define SUCCESS 0
#define FAILURE -1

// function prototypes
int SetSignalColor (String command);
void onDmxFrame(uint16_t universe, uint16_t length, uint8_t sequence, uint8_t* data);

// globals
Adafruit_NeoPixel strip = Adafruit_NeoPixel (PIXEL_COUNT, PIXEL_PIN, PIXEL_TYPE);
Artnet artnet;

// gamma correction table
const uint8_t gamma8[] = {
    0,  0,  0,  0,  0,  0,  0,  0,  0,  0,  0,  0,  0,  0,  0,  0,
    0,  0,  0,  0,  0,  0,  0,  0,  0,  0,  0,  0,  1,  1,  1,  1,
    1,  1,  1,  1,  1,  1,  1,  1,  1,  2,  2,  2,  2,  2,  2,  2,
    2,  3,  3,  3,  3,  3,  3,  3,  4,  4,  4,  4,  4,  5,  5,  5,
    5,  6,  6,  6,  6,  7,  7,  7,  7,  8,  8,  8,  9,  9,  9, 10,
   10, 10, 11, 11, 11, 12, 12, 13, 13, 13, 14, 14, 15, 15, 16, 16,
   17, 17, 18, 18, 19, 19, 20, 20, 21, 21, 22, 22, 23, 24, 24, 25,
   25, 26, 27, 27, 28, 29, 29, 30, 31, 32, 32, 33, 34, 35, 35, 36,
   37, 38, 39, 39, 40, 41, 42, 43, 44, 45, 46, 47, 48, 49, 50, 50,
   51, 52, 54, 55, 56, 57, 58, 59, 60, 61, 62, 63, 64, 66, 67, 68,
   69, 70, 72, 73, 74, 75, 77, 78, 79, 81, 82, 83, 85, 86, 87, 89,
   90, 92, 93, 95, 96, 98, 99,101,102,104,105,107,109,110,112,114,
  115,117,119,120,122,124,126,127,129,131,133,135,137,138,140,142,
  144,146,148,150,152,154,156,158,160,162,164,167,169,171,173,175,
  177,180,182,184,186,189,191,193,196,198,200,203,205,208,210,213,
  215,218,220,223,225,228,231,233,236,239,241,244,247,249,252,255 };

// setup
void setup ()
{
    // register our function with the particle cloud
    Particle.function ("SetSignalColor", SetSignalColor);

    // initialize artnet library
    artnet.begin();
    artnet.setArtDmxCallback(onDmxFrame);

    // initialize and clear Neopixels
    strip.begin ();
    strip.show ();
}

// loop
void loop ()
{
    // process pending Art-Net packages
    artnet.read();
}

// SetSignalColor
int SetSignalColor (String command)
{
    // local variables
    int i;
    uint32_t color;
    uint8_t r, g, b;

    // convert received string to a 24-bit RGB color value
    color = strtoul (command, NULL, 16);

    // pull out RGB values and gamma correct them
    r = gamma8[(color >> 16) & 0xff];
    g = gamma8[(color >>  8) & 0xff];
    b = gamma8[(color >>  0) & 0xff];

    // set pixel colors
    for (i=0; i < PIXEL_COUNT; i++) {
        strip.setPixelColor (i, r, g, b);
    }

    // show pixels
    strip.show ();

    // woohoo! we made it. return success status code.
    return SUCCESS;
}


void onDmxFrame(uint16_t universe, uint16_t length, uint8_t sequence, uint8_t* data)
{
    // local variables
    int i;

    // Control the RGB LED with the first 3 channels of universe 1
    if (universe == 1 && length >= 3) {
        for (i=0; i < PIXEL_COUNT; i++) {
            strip.setPixelColor (i, data[0], data[1], data[2]);
        }
        strip.show ();
    }
}
Compile and download the code to the Particle Photon using the usual process. Once the Photon has reconnected to the Particle Cloud, use the Particle Console to change the color of the signal a few times. Now for the fun part.

Controlling the traffic signal color via Art-Net and Photon on an iPad Mini.
Using an IP scanner utility or the DHCP lease table of your router, determine the IP address of the Photon on the local network and configure that IP address into the Art-Net settings in Photon or Luminair. Now create some sliders and drag them around to control the color of the traffic signal!
Next Steps
In the next parts of this project, I expand the signal from one light to three lights and move from a Particle Photon to a custom designed PCB with an ATSAMD21G18 microcontroller and ATWINC1500 Wi-Fi module. Stay tuned for the details.